Showing posts with label quilting. Show all posts

Wednesday, August 6, 2014

Finished Garden Fence Quilt

A few years back, I gave my mom a bundle of fabric for Christmas. I had finished my dad's quilt, but hadn't gotten far (or done anything really) on my mom's quilt. Several years have passed and I finally got around to finishing up and gifting her the quilt.

I used Lost and Found by My Mind's Eye for Riley Blake and the original Garden Fence tutorial from Hyacinth Quilt Designs. (I used the revised Garden Fence block for my dad's quilt.) This quilt uses 35 blocks that finish at 12 inches. I then added to narrow borders in a red Moda grunge fabric and then added an ivory border to make the quilt a bit bigger.

Mom's Garden Fence Quilt

The backing is a gray flat sheet from Target. I used a gray bias plaid binding.

Mom's Garden Fence Quilt

My friend, Kayli, did the quilting for me. She used various floral motifs from the prints on the front.

Mom's Garden Fence Quilt

I especially like the double flowers she free-handed.

Mom's Garden Fence Quilt

In the thin red border, she quilted these swirls.

Mom's Garden Fence Quilt

And the outer border is made up of piano key quilting. You can also see a bit of the binding in this pic.

Mom's Garden Fence Quilt

In addition to the quilt, I made a few pillowcases using this awesome tutorial, which is my go-to for pillowcase-making.

Pillowcases for Mom

It felt so good to finally finish this project. And I think my mom was happy to have something new to go in her newly remodeled bedroom.

Wednesday, April 3, 2013

Finally unpicked!

It took forever, but I finally finished unpicking all that quilting! Now to add a bit of fabric to the backing and it'll be ready for round two.

Gradated Mod Mosaic Quilt Top

Thursday, January 31, 2013

Finished Circle of Circle of Circle of Flying Geese Quilt

April has been my month in the Sew Beautiful Bee. In 2011, I asked my bee mates to make me circle of flying geese blocks using yellow, green, blue, and gray fabrics. It was fun to see the blocks begin to show up in the group photo pool.
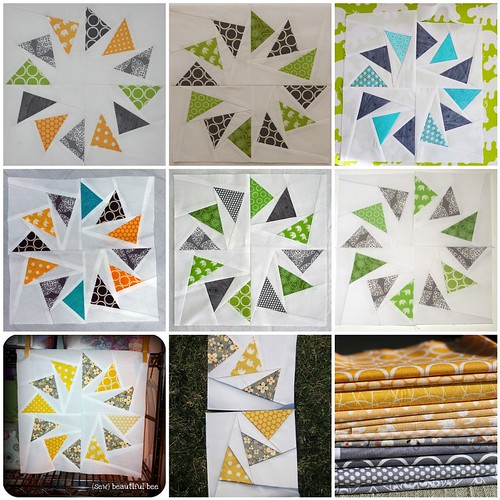
Sew Beautiful Bee Blocks for Me

A year later, in April 2012, I finally got my act together to piece the center double circle of flying geese block and then pieced all the blocks together.

Circle of Circle of Circle of Flying Geese

Then that quilt top sat for several more months until I finally pieced the back. By this time, Christmas was approaching and I knew I'd have to put it aside again. As the year came to a close, I decided that if I wanted to make a quick dent in my WIPs, I needed to be okay with the idea of sending some quilts out for quilting. (Before this past Christmas, the only longarm quilting I'd had done proved to be a bad experience. While the quilting looked nice, the lady charged me double what she quoted me PLUS she was really condescending about the design and fabric selection - not her style I guess, but she should have just kept her opinions to herself.)

Anyway, I talked with my good friend, Kayli, about doing the quilting for me and I think she did a great job! I really wanted there to be circles in the quilting since the whole design is circles upon circles. I really love the design she did and it wasn't something I had seen before.
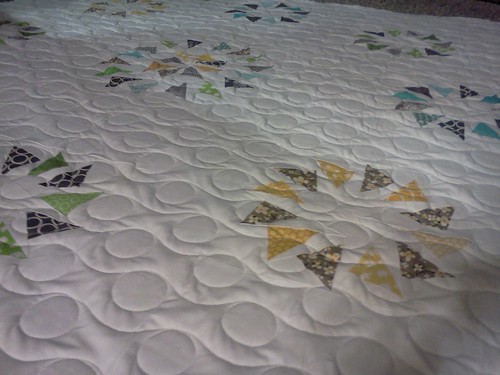
Circle of Circle of Circle of Flying Geese Quilting


She also added two layers of batting, so not only is the quilt nice and heavy and warm, but the quilting really stands out. And with all that white space, it's even cooler!
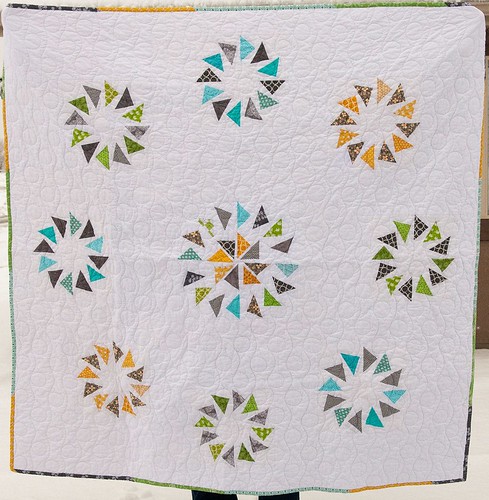
Finished Circle of Circle of Circle of Flying Geese

There were two blocks comprised of three colors, so I put those on the back with three colors of Lizzy House's Pearl Bracelets. (See? More circle repetition!) I also included the quilt label that Lee made for everyone in the bee that has all of our names and locations on it.
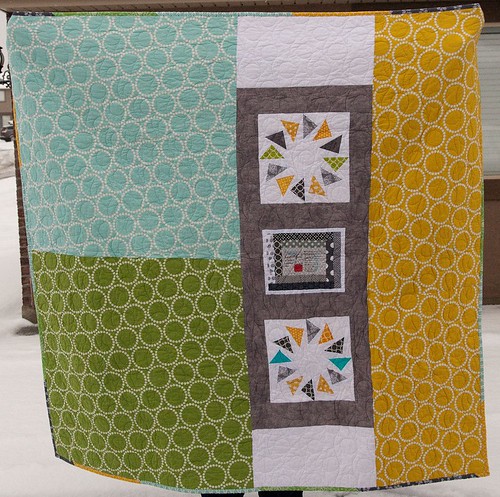
Finished Circle of Circle of Circle of Flying Geese

I made a scrappy binding of yellow, green, blue, and gray prints. (I'm really loving scrappy bindings right now!)

Quilt Stats

Size: 70x70 before washing
Design: Circle of Flying Geese paper piecing template found here; Double Circle of Flying Geese paper piecing template designed by Lynne of Lily's Quilts; design arrangement by me
Quilting: Kayli Taylor

Wednesday, November 9, 2011

WIP Wednesday - 1st Anniversary

WIP Wednesday at Freshly Pieced

I haven't done a WIP Wednesday post for a while, but boy have I been busy this week! Documenting my progress will help me see where I'm at and how much I want to accomplish before going back to work in three weeks.

Quilting
I made a goal to finish the quilt tops that I had lying around before starting any new quilts. While I didn't totally stick to that goal (you gotta be flexible, right?), I am this close to meeting that goal. This week I spent time quilting four of the five quilts that I basted a couple weeks ago. I tried to be more conscientious with the quilting. While I did an all-over loopy pattern on one, the others have straight lines, loops, flowers, swirls, snails, and a decorative stitch.

Quilting Mosaic

Baby Sewing
One of the downsides to not finding out the gender of our baby when I was pregnant was that I didn't want to do any sewing projects and make something gender neutral. I saw this tutorial for a sleep sack on Make It and Love It and decided to run to Joann's to get some fleece that was on sale.

This one is the prototype. I didn't need to add a seam allowances for the neck and arm holes, so it sits too high and the arm holes are not as loose as I wanted them to be.

Infant Sleep Sack

This one turned out much better, although there are still some improvements to be made. This picture makes it look funny too, but it actually fits my daughter really well. Sewing with fleece isn't my forte, but it keeps my baby warm at night. I'm debating whether I want to try making another one or not.

Infant Sleep Sack

I'm not sure if all Joann's have the same merchandise, but I noticed something new since the last time I was there. They have an aisle dedicated to making your own cloth diapers. I was SO HAPPY to see this aisle. I cloth diapered my two older kids and am bummed that I won't be able to cloth diaper my baby. This is kind of a lame excuse, but with working outside the home now, I have absolutely no time for diaper laundry. While I was perusing the aisle at Joann's, looking through the diaper-making books, I decided to grab some PUL (polyurethane laminate, which prevents leaks) to make some changing pads. I used PUL on one side and soft fleece on the other. One down, four more to go.

Baby Changing Pad

Rotary Cutting
I spent time last night cutting the charms for round 2 of the Color Wheel Charm Swap. I also cut 10" squares for a swap for the Salt Lake Modern Quilt Guild meeting this month. My local quilt shop moved locations and had a grand opening this past weekend. Their sale fabric was 75% off and I was able to get a couple yards of this Neptune print by Tula Pink for about $3.50! Talk about a screamin' deal.

To-Do Before Going Back to Work
  • Finish quilting Swirling Stars quilt
  • Make bindings for the quilts in progress
  • Finish the three changing pads I've cut out
  • Make five pairs of PJ pants for my family for Christmas Eve
  • Make gifts for the cousins whose names my kids drew for Christmas

I'm sure I have more to do since I have a tendency to start new projects all the time. But I have to admit that it feels so good getting all these quilt tops quilted and turned into finished quilts. It's this huge weight off my shoulders.

Saturday, November 27, 2010

Finished Weihnachtsstollen Quilt

I started this quilt back in the summer, but then put it away to work on other projects. I wish I hadn't because then I had to scramble last week to finish it. It was a Christmas present for my mom and I wanted it ready for her to have out the entire month of December. We set up her Christmas decorations yesterday.

This was my first try at a disappearing nine-patch pattern. I like how the design worked out and the colors are great for my mom.

Weihnachtsstollen Quilt Front

For the quilting, I straight-line quilted 1/4" on each side of the sashing strips, then I quilted concentric squares within each set of blocks. I love the design it created on the back.

Weihnachtsstollen Quilt Back

It was a nice surprise for my mom Thanksgiving morning. My dad told me yesterday that my mom stops to look at it on her way to the bathroom, which is saying something since she usually doesn't stop for anything when she's gotta go.

Tuesday, October 12, 2010

Finished Coins for Clara Quilt

I had another quilt-related marathon this weekend. I finished the Coins for Clara quilt. I wanted to try straight-line quilting on a larger scale - since I've only done a little bit on one quilt and a nametag - and I love how it turned out. I thought it would take way more time than it did (I think it was only about an hour and a half's worth of work).


I upped the stitch length to 7 and I think the longer stitches are the look I've been trying to get when I've attempted this in the past. I sewed two seams down each white sashing strips, about 3/4" apart, then turned the quilt and made a grid pattern that mostly outlined each coin section. I then added a few more lines to the middle sections.


I didn't worry about marking the quilt at all. I just let my lines be as straight as they wanted to be. It's a bit organic-looking and I love the non-rigidity of the not-perfectly-straight lines.


The quilting really accents the stacked coin design. Although I want to improve my free-motion skills, it's nice to have a quilt with quilting that looks decent.


In lieu of a separate label that I attached to the quilt back, I opted to write directly on the backing. But then I accidentally stitched right through my name. Oops.


I had some solid green in my stash and it happened to match the fabric collection perfectly so I used it with the brown print for the backing.


I tried a new binding method this time. (I've done the binding differently on every quilt I've made.) I've settled on the width that I like (3 inch strips), but haven't decided on the attaching method. This time, I tried Red Pepper Quilt's machine method. It made the front look pretty good, but I didn't catch the binding underneath a couple times so it looks a little funny. I guess if I had pinned the binding down I wouldn't have had that problem.

So far, I think the binding method I like the best is to attach the first part of the binding to the back of the quilt, then I fold it over to the front and topstitch it down. I've gotten pretty good results with even/straight stitches the last couple times I've used it so I think I'll stick with that method. I want to try hand stitching sometime, but my problem is that I'm too impatient. Even though I think hand stitching looks great, the thought of spending hours doing something by hand that I can do much quicker by machine makes me a little crazy. I'm making a doll quilt for my quilt group's color challenge so maybe I'll try hand sewing the binding on that small quilt.


The quilt measures about 43 inches square, before washing. My washing machine decided to go kaput this weekend and not spin the water out of the clothes. The new washer won't arrive until Friday. I love the washed look so I'm antsy for Friday to get here.

Do you wash your quilts after you've finished them, but before gifting them? There's a good discussion here that I'm totally on the same page with.

Make sure to check out Sew and Tell this week.


Tuesday, September 28, 2010

Finished Rocket Me to the Moon

During my time off work last week, I finished the quilt for my son's bed, Rocket Me to the Moon.

I knew I wanted to quilt this one with something other than all-over loops, but it took a little while to decide exactly what I wanted to do. I started by outlining each square with a stitch about 1/4" inside the square on all sides. Then I was going to quilt the blue sashing only. But, then I thought it would be more fun to free-hand stars, planets, moon rocks, and an alien robot within each square instead.

Here are some moon rocks (free-motion pebbles).


Here are some stars.


The planet Saturn on the front.


And how it looks on the back.


And finally, a little alien robot on the front.


And back.


When I finished quilting all the squares, I almost left it at that, but then felt like the sashing was missing something. So, I quilted some wiggly lines vertically and horizontally along every sashing line. I like how it gives each square its own frame.


I bound the quilt in the same rocket wave fabric as the large squares on the quilt top and the waves make nice wavy stripes on the binding.


While the quilt was washing and drying, I made a matching pillowcase with the last of the rocket waves fabric. It was lacking a little something on the end so I appliquéd the same rockets that are on the back of the quilt and on the curtains in my son's room.


I wanted to get a picture of the entire quilt, but the grass was wet this morning and I don't have any helpers today to help me hold the quilt up. Oh well. You get the idea.


Be sure to check out Fabric Tuesdays today.

Fresh Poppy Design

Monday, September 20, 2010

Finished Charity Quilt

First off, I just wanted to say thanks to all of you who have left comments about this quilt (through its many phases), and the Rocket Me to the Moon quilt. I've meant to reply to all your comments, but life has been pretty hectic for me and I won't be able to respond. But I do want all of you to know that I appreciate your kind words...they are great motivation for me.

I finished the charity quilt last week in time for the auction, but they ended up pushing the auction back a week. That was nice because then I had something to take to show and tell at our monthly quilt guild meeting.


I did all-over swirls for the quilting. I'm trying to work on moving the quilt at a consistent speed and I think I'm improving a bit. At least my stitch-length is starting to look more even.


I cut 3" strips for the binding this time. I also took greater care to make sure my lines were as straight as possible. I do my bindings backwards than most of you, I'm sure, but I think this works for me. The mitered corners turned out quite nicely.


This was a fun project to work on, but I'm glad it's done. The other day I made a list of everything I'd like to quilt and the list was over 30 items long. I prioritized the top ten that I'd like to have done before Christmas. As this quilt was on the list, I'm happy to cross it off and move on to the next one.


I have a few days off work this week so I'll be attaching the binding to my Rocket Me to the Moon quilt and it will be ready for my son's bed. That'll shorten my list to eight to-dos by December.

Tuesday, June 22, 2010

Finished Frolic Around the House

Here's my finished Frolic Around the House quilt, a housewarming gift for my in-laws. I was able to get this one done in record time, two weeks!


When Frolic first came out, I didn't love it. But then, Natalia brought the quilt she designed for Moda Bake Shop to one of our Modern Quilt Guild meetings a couple months ago and I loved the browns, greens, and blues in the line and decided to try it out.


When I took the quilt over to my in-laws' house last week, my mother-in-law loved the bright colors and the patterns in the fabric.


This green print is my favorite in the line.


I love how bright and cheery the quilt turned out. Totally fitting for the time of year. And I'm finding that my aesthetic is leaning toward the more simplistic style and design of quilts. Maybe that's why I loved this quilt more than Peekaboo Blush.


Now that I've finished these two quilts, I'm gearing up to start my sister-in-law's quilt. It's a completely different design and process from what I've done in the past (not that that's saying much since I've only finished about five quilts so far). I'm excited to try something new. Along with that, I need to start this bag for my good friend and finish a quilt I started with the last two (a surprise gift for someone special).

LinkWithin

Related Posts with Thumbnails