Monday, August 30, 2010

Charity Quilt Top

A couple weeks back, my brother-in-law asked if I'd be willing to make a quilt to donate for a silent auction. There's a little boy in his neighborhood with Cerebral Palsy. The whole neighborhood has banded together to raise money for this little boy and his family. At various times in my life, my family has been the recipient of such kindness and I wanted an opportunity to pay it forward.

I bought a Frolic jellyroll a few months back without a specific idea of what to make with it. After the call from my brother-in-law, I set out on trying to figure out what sort of design to use for this charity quilt with the jellyroll. At our July quilt guild meeting, one of the girls brought a string quilt. I loved the look, but I'm totally intimidated by paper-piecing. Then I saw this pattern, which just so happened to use the Frolic line. After searching a bit more for inspiration, I read through Cluck Cluck Sew's easy double hourglass tutorial and knew I could find a way to fuse all these looks together. Here's what I came up with:

Note: The photos link to flickr so they're cut off a little on the right side.
Frolic Charity Quilt

I constructed each block using CCS's directions for the double hourglass blocks, but I made mine using three jellyroll strips.

I started by separating the jellyroll strips into sets of three, making sure to create contrast in the pattern and color, but also making sure the strips went well together. Then I took out my trusty ruler and cut each strip at 45 degree angles, alternating the direction of my ruler.

Charity Quilt, Strip

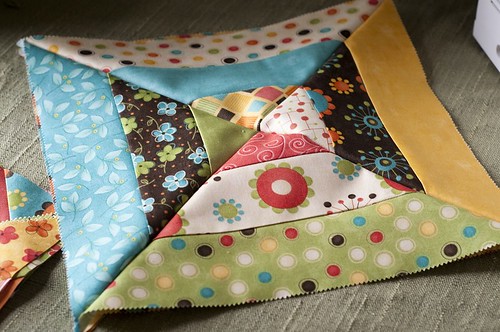
I was able to get five triangles from each jellyroll strip set. I paired four of them together as shown below. I reserved the leftover triangle for later use. Sewing the triangles into a block was tricky because of the cut being on the bias. When you sew something this way, you have to make sure not to stretch the fabric or else your block will bubble.

Charity Quilt Block

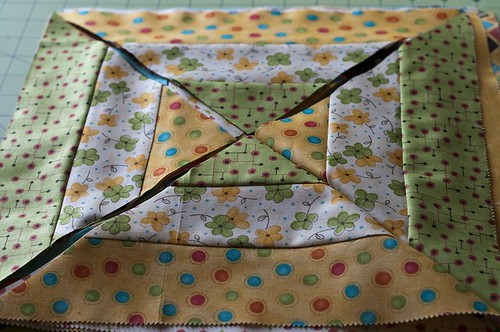
The 42 jellyroll strips gave me 16 12" blocks, 13 of them looked symmetrical like the one above, and other three were comprised of the leftover triangles, making them look a bit more scrappy.

Charity Quilt Block, Varied

Each strip set had a bit more leftover so I cut a few smaller triangles and paired them together like so.

Charity Quilt Block, Post

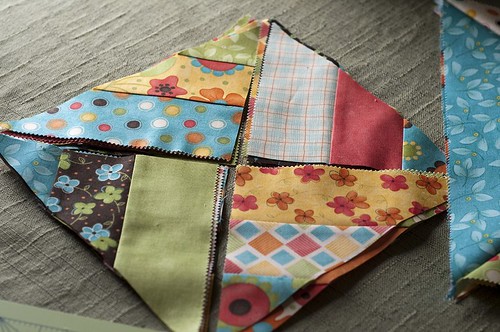
I had enough smaller triangles for six 8" blocks, but I only used four blocks as the corner posts at the ends of the borders.

Frolic Charity Quilt

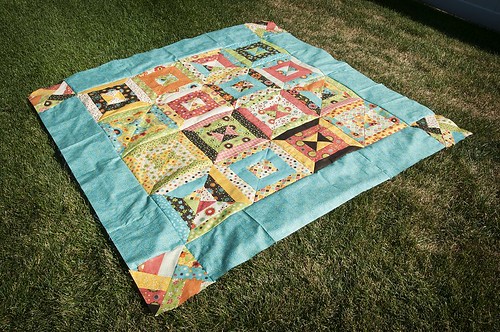
The quilt top measures about 60 inches square, a good size lap quilt. I need to pick up the backing material still and my deadline is swiftly approaching (September 15) so I best get crackin'. Hopefully the quilting and binding will go fast and I can hand this quilt off for the silent auction ASAP.

Linking up:
Fresh Poppy Design


Sunday, August 29, 2010

JRS Quilt-Along Quilt Top


I finally took the time this weekend to finish the last block for my Jelly Roll Sampler Quilt-Along quilt top. I only made nine of the blocks (instead of 12) because I was really getting burned out on the fabric. I have to say though that now that the top is all put together, I like it much more than I thought I would. It's definitely not my favorite, but it's not as horrible as I thought it might be. A while back, I bought an extra yard of one of the prints from the Oddysea line that I really liked. I'm glad I did because I was able to use that as the outer border.

My plan is to use a solid brown or green as the backing with a little pieced strip of Oddysea to break it up. I'll be making a scrappy binding out of various left-over jellyroll strips.

On a side note, I was quite the busy little quilt-top-piecer this weekend. Keep your eyes peeled for more to come. I pieced three tops, bringing my total tops ready for basting up to four. I like the assembly-line method of piecing several quilt tops at once, basting several at once, quilting several at once, and binding several at once. Too bad I don't have enough pins to baste four quilts (I'll be pushing it with two).

Anyway, that's it for now. I hope you all had a great weekend.

Friday, August 27, 2010

Chore Chart

A while back, I saw the chore chart Emily at Not So Idle Hands made for her little girls and knew I wanted to make one some day. At the time, my oldest was not quite three and we hadn't been working a ton on making him do chores. But, now that he's three and a half, I thought it would be good to make one. I used Emily's magnet images, but only used the chores that I felt my son would be able to do (clear the table, pick up toys, get the mail, etc.) as well as some other chores that he can help with (sweeping, vacuuming, cooking dinner, etc.).


I already had this magnet board lying around and decided it would be great for this project. I printed the chart itself out on scrapbook paper and cut it to fit within the frame. I didn't modpodge the paper down, like Emily did, because I am thinking I may use the magnet board for another project too (like a Family Home Evening board). I did, however, follow Emily's directions for printing and making the magnets. I ordered the glass tiles, magnets, and diamond glaze from Sun and Moon on Etsy.


This project was so easy and I really love the tiles and magnets that I bought online. I've made fridge magnets before, but anytime one of my kids would drop one on the floor, the glass gem would separate from the magnet, which was a pain.

Now I have a good tool for teaching my son how to work and it's cute too, which is always a plus.

Saturday, August 21, 2010

Finished Freebird Picnic

I finished Jessica's Freebird Picnic quilt last week and gave it to her this past Sunday. I think she was pleased with it.


I had a bugger of a time with the free-motion quilting this time around. The tension kept getting all screwy on the back and I think I unpicked several sections at least 10 times. Good thing I love you, Jess. If it were any other quilt I may have just left the back as is.


I liked the dot fabric for the binding because it really does give it a little pop. I had heard that some people don't like using dots on bindings because it's hard to get the dots to line up. I definitely had that problem here, but it only bugs me when the quilt is laid out as in the first picture. Otherwise, I really like it. I ended up buying another yard of the dots fabric to make my daughter a dress.


I did all-over loops on the main part of the quilt. Then I quilted a straight line 1/4" into the brown border, and finished the quilting with a wavy stitch through the middle of the border.


I wish I was better at free-motion quilting. And maybe quilting in general. My favorite part of making quilts is piecing the top. I think because that's what looks the most like the quilt. The rest of the process is just a necessary evil. Well, not evil, but you know what I mean.

Next up? I need to make some progress on a charity quilt as it's due in about three weeks. I'm also turning the top of my son's quilt into the back (ya know, since it's so ugly) and need to piece the squares that I cut for the new top. We bought him a big boy bed and will be getting the mattress and box springs soon. I want to have the quilt ready to go when we get the bed set up.

Thursday, August 19, 2010

Finished Scrapbuster Pillow


After making the front of the pillow, I had to trim the edges to determine the size of the final pillow.


I took some scrap strips of fabric to make the back. I decided to do this one all of the same fabric, but I think it would look cute using different sized strips of a variety of fabrics for the envelope back.


After making the pillow cover, I started making the pillow form. (This was probably the backwards way to do it, but it worked fine for me.)


Before making the rainy day pillow last month, I probably never would have attempted to make my own pillow form. It just wouldn't have occurred to me. But then Kati showed some pillows she made at our Modern Quilt Guild meeting a couple months back and she totally opened my eyes to the possibilities of pillow forms.


I took a pillow from my son's room that I didn't care for, ripped off the fabric cover, and used the stuffing for my new pillow. Closing the pillow form after it's been stuffed is always a challenge for me because of the puffiness of the pillow, so I think next time I'll just close it by hand with a needle and thread.


I thought it would be fun to use piping around the pillow edge (I've never done that before and it would be fun to try), but I wanted the pillow to be a bit simpler to appeal to more of the sisters in my ward for a project they would want to attempt if they have little or no sewing experience.

I plan to make more covers too. It'll be fun to make one for each month of the year, or at least for different seasons or holidays.

Now, head on over to AmyLouWho's for more show and tells.


And make sure to check out Quilt Story's Fabric Tuesday.

Fresh Poppy Design

Monday, August 16, 2010

Scrapbuster Pillow (my version)

Before I got into quilting last December, I saw this pillow by Allison of Cluck Cluck Sew and knew I had to make one. (By the way, I'm pretty sure that her blog was the catalyst that started me wanting to learn how to quilt. She's uber talented!) Alas, other projects got in the way and I never got around to making the pillow.

Fast forward several months to last week. I'm on a committee for my church group that plans activities for the adult women in our congregation (ward) and we've started talking about hosting a crafting Saturday in November (we call it Super Saturday). Of course, my wheels started spinning and I woke up several times during the night throughout the week to jot down ideas of things we can make in the four-hour timeframe for our Super Saturday. One of those ideas was Allison's appliquéd tree pillow.

On Tuesday, we're having another meeting to finalize the projects/crafts to make, so I finally started on the pillow last night.


I pulled out some scraps from Freebird Picnic (the brown was perfect for the tree trunk), and set to work. I didn't put as many leaves on my tree because I used all the heat'n bond that I had on hand.


I followed Allison's tutorial and found her way of laying the fabric on the fusible material so much better (and easier) than the way I usually do it. I'm pretty much a waste-hater so I usually try not to waste, even if it makes my process harder. But, I think Allison's way is much much easier.


After placing all the leaves where I wanted them, I pressed them onto the fabric to be used as the pillow front (I used a Kona cotton that I had on hand, but you can certainly use a heavier weight fabric like Allison did).

Before stitching the leaves and trunk, I played around with some of my machine's decorative stitches. I initially planned on doing a blanket stitch, but then tried out this leaf design and really liked how it looked on each scrap of fabric. On a couple of leaves that didn't have a lot of contrast, I added a seam down the center of the leaf to look like its main vein.


I plan on finishing the pillow tonight so it will be good to go tomorrow for our meeting. It will be rectangular since I wanted the tree trunk to be a tad longer.

I think this is such a great way to use up scraps and to personalize your space. I'm thinking about more and more pillows/pillow covers I can make to go with the different holidays and special occasions that we celebrate at our house.

Thursday, August 12, 2010

Block 8

I was five blocks behind in Moose Quilt's Jelly Roll Quilt-Along (she's posted all the blocks and the finishing instructions so I'm WAY behind). As part of my sewing time last night, I worked on block 8. (I'm such a lazy presser. This block would look better had I taken the time to press it, but oh well.)


I'm getting sick of the Odyssea line. I really like certain prints in the collection, but not all of them. I'm also not doing a very good job of choosing the fabrics for each block. This is the third one that I haven't cared for because of my fabric choices (not enough contrast with the center nine patch). I also think that my dislike for the fabric made me fall behind and I'm only moderately compelled to finish the rest of the blocks.


My brother-in-law asked me to make a quilt to auction off for a boy in his neighborhood with cerebral palsy. When this quilt is finished I may donate it along with the other one (more on that to come) since I'm just not loving it.

Wednesday, August 11, 2010

Oh, how I wish I didn't have a day job.

I'm a technical writer with the blessing of working from home. My typical day starts between 7 and 7:30 when my three-year-old comes in and wakes me up. Then it's downstairs to start work. Shortly after, my almost-two-year-old wakes up. Then it's quick breakfasts for everyone and I'm back to work. The little ones play and I work. And work. And work. I wish I could quilt instead.

My sewing/creative time lately has been full of working on Freebird Picnic. It's taking me longer to get it done than I like. I finished the free-motion quilting the other day, but it was a very frustrating experience as the tension on the back kept getting screwed up and I had to unpick it at least ten times. I still need to attach the label and then quilt the border and bind the quilt. I'm hoping to work on it tonight and tomorrow, with plenty of time to finish it by Sunday.

As I work full-time, I only get to quilt in the evenings after the kids are in bed (in between taking my three-year-old back to his room twenty times each night). If I try to sew after work while the kids are still awake, my littlest one just wants to climb on my lap. There are so many projects that I want to work on, and I often get inpatient and start new projects before the in-progress quilts are complete. My want-to-make-one-day list is WAY too long and I've struggled with the need to prioritize what gets done.

Oh, how I wish I had endless amounts of time to spend doing the things I want to do instead of the things I have to do. I know I'm dreaming, but doesn't it sound wonderful not having so many responsibilities, and instead having an unlimited amount of time to quilt?

Sunday, August 8, 2010

Straight-edge whirligig block

*If anyone knows what this block is called, please let me know.*

While piecing Jessica's Freebird Picnic quilt, I played around with different layouts for the 4.5 inch squares and decided to try a version of a whirligig block with straight edges.


I used two charm packs, one Freebird and one neutral. This would be an easy block to chain piece by alternating sewing a Freebird charm to a neutral charm. Once you have a strip of charms 84 pieces long, you can cut in half of each charm, giving you your 4.5 inch squares.


I sorted my new squares by pattern and then by color. For this quilt, I wanted each whirligig block to be mostly the same color, or same two colors. I tried to vary the pattern in each block, but with the same overall color(s).


When I pieced the blocks, I made sure to align my center points and worry about trimming the blocks down to about 8 inches before piecing the top.


The quilt will consist of 30 blocks, six rows by five columns. At around 40x46 inches, it'll be a nice baby quilt. My sister-in-law just had a baby girl a couple weeks ago, so this little quilt will be perfect for Baby Clara.


I've been pretty MIA this last week. I'm trying to finish up Jessica's quilt so I can get it to her next Sunday at our family dinner. I have the free motion quilting to finish (which looks pretty sad when you see the white thread against the brown backing - there's definitely room for improvement there). I'm also going to try a different quilting pattern on the border to give it a little more personality. Then I need to make the binding and attach the label. I'll post photos of the finished product before I hand it off next weekend.

LinkWithin

Related Posts with Thumbnails