Showing posts with label fabric tuesday. Show all posts

Tuesday, March 1, 2011

Practice Bee Block Turned Pillow

Remember this practice dresden plate block I made back in January?

Dresden practice

I didn't know what to do with it because the colors don't really match any decor in my house. My mom-in-law made a comment that it reminded her of a quilt from her childhood made out of old clothes. I asked her if she wanted me to make a pillow or wall quilt for her. She chose a pillow.

Dresden Plates Pillow

I had a 20" pillow form and the dresden plate fit pretty well on a 19.5" square of Kona white (I like my pillow covers fitting snugly on the pillow form so I make them 1-2 inches smaller).

Dresden Plates Pillow

For the back, I used a single print from the front to make an envelope closure, which is my go-to pillow closure. I'm not sure I'll branch out of that anytime soon.

Dresden Plates Pillow Back

Linking up to:

Fresh Poppy Design


Tuesday, September 28, 2010

Finished Rocket Me to the Moon

During my time off work last week, I finished the quilt for my son's bed, Rocket Me to the Moon.

I knew I wanted to quilt this one with something other than all-over loops, but it took a little while to decide exactly what I wanted to do. I started by outlining each square with a stitch about 1/4" inside the square on all sides. Then I was going to quilt the blue sashing only. But, then I thought it would be more fun to free-hand stars, planets, moon rocks, and an alien robot within each square instead.

Here are some moon rocks (free-motion pebbles).


Here are some stars.


The planet Saturn on the front.


And how it looks on the back.


And finally, a little alien robot on the front.


And back.


When I finished quilting all the squares, I almost left it at that, but then felt like the sashing was missing something. So, I quilted some wiggly lines vertically and horizontally along every sashing line. I like how it gives each square its own frame.


I bound the quilt in the same rocket wave fabric as the large squares on the quilt top and the waves make nice wavy stripes on the binding.


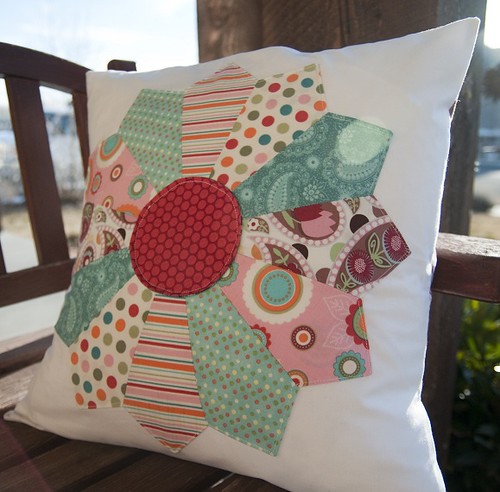
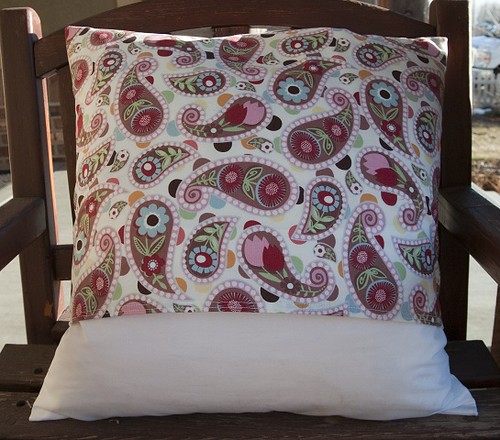
While the quilt was washing and drying, I made a matching pillowcase with the last of the rocket waves fabric. It was lacking a little something on the end so I appliquéd the same rockets that are on the back of the quilt and on the curtains in my son's room.


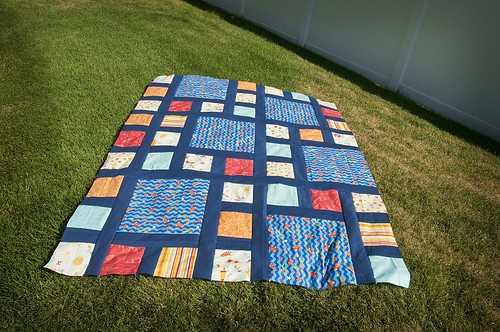
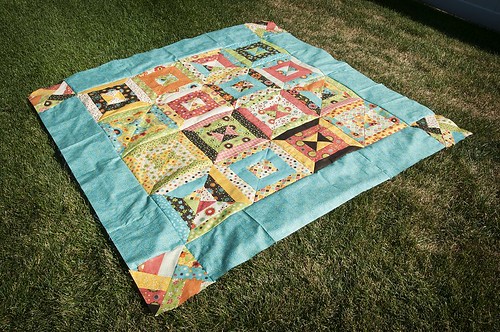
I wanted to get a picture of the entire quilt, but the grass was wet this morning and I don't have any helpers today to help me hold the quilt up. Oh well. You get the idea.


Be sure to check out Fabric Tuesdays today.

Fresh Poppy Design

Tuesday, September 7, 2010

Rocket Me to the Moon Quilt Top

Remember last weekend when I said I got three quilt tops done in three days? Here's the last of the three, minus the outside border that I've since added.

Rocket Me to the Moon Quilt Top

Way back when I first started quilting, I made this quilt top for my not quite three-year-old at the time. I was so proud of myself. I appliquéd those little rockets on there and thought I was the beezneez. But, as I learned more about quilting (like not using 1/2" seams, which is what I did here), I realized that this quilt top was crap. I tried to think of ways that I could salvage it, but everything I thought of required more work than I wanted to put into it. I'm also a cheapskate when it comes to most things and couldn't stand the thought of tossing it out. So, I decided to turn it into the backing and make a new quilt top.

I bought some Rocket Wave fabric by Michael Miller. I initially planned on just making a quilt top mostly out of that fabric without too much piecing. Then I saw these blocks by Amy of Diary of a Quilter and had to pick up these other rocket/space fabrics by David Walker to add to the quilt top. I was perusing a quilt magazine (sorry, I can't remember which one) and saw a quilt with this design (can't remember the name of it either) that I totally loved and thought it would be nice and boy-ish with these fabrics for my now three-and-a-half-year-old.

Rocket Me to the Moon Quilt Top

The colors aren't exactly the same as what I've already used in his room (like for his curtains), so I used the navy blue fabric as the sashing to tie the colors together a bit more.

I finished the quilting yesterday and need to bind it. I'll post more photos of the final product soon, along with matching pillows and pillowcases. For now, it's on hold so I can finish up the charity quilt. It's due a week from tomorrow and I still need to finish piecing the back (an update on that coming soon), baste it, quilt it, bind it, and wash it! Ack!

Linking up:

Fresh Poppy Design


Monday, August 30, 2010

Charity Quilt Top

A couple weeks back, my brother-in-law asked if I'd be willing to make a quilt to donate for a silent auction. There's a little boy in his neighborhood with Cerebral Palsy. The whole neighborhood has banded together to raise money for this little boy and his family. At various times in my life, my family has been the recipient of such kindness and I wanted an opportunity to pay it forward.

I bought a Frolic jellyroll a few months back without a specific idea of what to make with it. After the call from my brother-in-law, I set out on trying to figure out what sort of design to use for this charity quilt with the jellyroll. At our July quilt guild meeting, one of the girls brought a string quilt. I loved the look, but I'm totally intimidated by paper-piecing. Then I saw this pattern, which just so happened to use the Frolic line. After searching a bit more for inspiration, I read through Cluck Cluck Sew's easy double hourglass tutorial and knew I could find a way to fuse all these looks together. Here's what I came up with:

Note: The photos link to flickr so they're cut off a little on the right side.
Frolic Charity Quilt

I constructed each block using CCS's directions for the double hourglass blocks, but I made mine using three jellyroll strips.

I started by separating the jellyroll strips into sets of three, making sure to create contrast in the pattern and color, but also making sure the strips went well together. Then I took out my trusty ruler and cut each strip at 45 degree angles, alternating the direction of my ruler.

Charity Quilt, Strip

I was able to get five triangles from each jellyroll strip set. I paired four of them together as shown below. I reserved the leftover triangle for later use. Sewing the triangles into a block was tricky because of the cut being on the bias. When you sew something this way, you have to make sure not to stretch the fabric or else your block will bubble.

Charity Quilt Block

The 42 jellyroll strips gave me 16 12" blocks, 13 of them looked symmetrical like the one above, and other three were comprised of the leftover triangles, making them look a bit more scrappy.

Charity Quilt Block, Varied

Each strip set had a bit more leftover so I cut a few smaller triangles and paired them together like so.

Charity Quilt Block, Post

I had enough smaller triangles for six 8" blocks, but I only used four blocks as the corner posts at the ends of the borders.

Frolic Charity Quilt

The quilt top measures about 60 inches square, a good size lap quilt. I need to pick up the backing material still and my deadline is swiftly approaching (September 15) so I best get crackin'. Hopefully the quilting and binding will go fast and I can hand this quilt off for the silent auction ASAP.

Linking up:
Fresh Poppy Design


Thursday, August 19, 2010

Finished Scrapbuster Pillow


After making the front of the pillow, I had to trim the edges to determine the size of the final pillow.


I took some scrap strips of fabric to make the back. I decided to do this one all of the same fabric, but I think it would look cute using different sized strips of a variety of fabrics for the envelope back.


After making the pillow cover, I started making the pillow form. (This was probably the backwards way to do it, but it worked fine for me.)


Before making the rainy day pillow last month, I probably never would have attempted to make my own pillow form. It just wouldn't have occurred to me. But then Kati showed some pillows she made at our Modern Quilt Guild meeting a couple months back and she totally opened my eyes to the possibilities of pillow forms.


I took a pillow from my son's room that I didn't care for, ripped off the fabric cover, and used the stuffing for my new pillow. Closing the pillow form after it's been stuffed is always a challenge for me because of the puffiness of the pillow, so I think next time I'll just close it by hand with a needle and thread.


I thought it would be fun to use piping around the pillow edge (I've never done that before and it would be fun to try), but I wanted the pillow to be a bit simpler to appeal to more of the sisters in my ward for a project they would want to attempt if they have little or no sewing experience.

I plan to make more covers too. It'll be fun to make one for each month of the year, or at least for different seasons or holidays.

Now, head on over to AmyLouWho's for more show and tells.


And make sure to check out Quilt Story's Fabric Tuesday.

Fresh Poppy Design

LinkWithin

Related Posts with Thumbnails