Showing posts with label free motion quilting. Show all posts

Tuesday, January 6, 2015

Finished Pixelated Dragon Quilt

For the past few years, I've made a couple quilts for Christmas for my in-law family. Since the recipients know they're receiving quilts, I usually ask for color choices and general styles. Here's how the conversation with my brother-in-law went this year.

Me: What colors do you and your wife like?
BIL: She said we'd like something in black, red, and gold with dragon motifs.

He was joking at the time, but when I reminded him that I was making separate quilts for each of them, he said a bit hesitantly, "Well, I actually really would like a dragon quilt." So, that's what I set out to make for him.

I brainstormed for quite a long time about different possible ways of making a dragon quilt - paper piecing, applique, patchwork. I had almost settled on paper piecing, but wanted to enlarge all the patterns I found. I kept hemming and hawing because I wasn't fully committed. Then, I happened upon the Patchwork Pattern Maker from the Victoria and Albert Museum, which is this really great tool you can use to turn any photo into a quilt pattern. I searched for and tested several images of dragons until I found one that I liked and thought would translate best as a pixelated image.

Pixelated Dragon Quilt

I cut up three inch squares of varying prints in black, gray, green, red, orange, and yellow. For the background, I used whites and creams, whatever I had on hand. I then added some wide strips of fabric to the bottom of the quilt, representing a building or some other hard surface that the dragon is landing on or taking off from.

Pixelated Dragon Quilt

I quilted the body of the dragon in wavy lines and the wings have a scale motif quilted on them. The background I quilted in meandering loops.

Pixelated Dragon Quilt

I quilted each section of the "building" with a separate design. This one shows the angled meandering stipple and if you look closely at the yellow, you can see large ripples.

Pixelated Dragon Quilt

The back is comprised of various green fabric strips. I'm kind of a one-trick pony when it comes to quilt backs (if I piece the back at all), so I was glad to have a fairly easy, but not a flat sheet quilt back.

Pixelated Dragon Quilt

Wednesday, May 28, 2014

Finished Nordika Tumbler Baby Quilt

After I finished my Nordika Scrappytrip quilt, I had a lot of leftover fabric strips, enough to make this baby quilt as well as a few Dresden wedges that I'll get around to showing one of these days.

One of my friends is having her third baby and this time, it's a girl so I thought this would be a great set of fabrics for her little one. I played around with cutting the pieces and settled on tumblers. Thus, the Nordika tumbler baby quilt:

Nordika Tumbler Baby Quilt

I used a strip of the tumblers on the back along with some oval elements and one of my favorite Nordika prints.

Nordika Tumbler Baby Quilt

Back in April, I did a little demo at the Salt Lake Modern Quilt Guild meeting on how I free-motion quilt. I then let anyone who wanted to try sit down with this quilt. So this one has a variety of quilting, including these cute little flowers.

Nordika Tumbler Baby Quilt

I showed how I like to incorporate words into my quilting occasionally. This one has the words "love" and "family" FMQed into the edge of the quilt.

Nordika Tumbler Baby Quilt

For the binding, I used the red floral print that dominates the quilt as well as the tartan plaid and a solid light gray.

Nordika Tumbler Baby Quilt

My friend's baby is due in June so I'll be wrapping this one up and sending it her way soon.

Nordika Tumbler Baby Quilt

Wednesday, July 17, 2013

Finished Modern Yardage Quick Curve Ruler Star Block Quilt

At the end of June, I posted about a new quilt I had started featuring some Modern Yardage fabric called Personality by Emilie Daly.

I set to work cutting the fabric and trying out my new Quick Curve Ruler (blogged about here and here) to make these star blocks. The blocks themselves used almost exactly the two yards of fabric that I received from Modern Yardage - talk about a happy accident since I didn't plan that! I pieced the blocks together and then added a border to make it a bit bigger. Here's how it turned out.

Modern Yardage Quick Curve Ruler Star Block Quilt

For the backing and binding, I pulled colors that I had on-hand in my stash that went with the Carefree colorway of the Personality fabric.

Modern Yardage Quick Curve Ruler Star Block Quilt

I wanted to try out my echo quilting foot so I free-form followed the shape in the negative space between the blocks. It was a bit tricky getting the hang of using the echo foot. By the time I hit the center of each section, my lines were more curved rather than boxy so I'll definitely need to practice more. I love the texture it created though.

Modern Yardage Quick Curve Ruler Star Block Quilt

Tuesday, February 12, 2013

First Finished Baby Quilt of 2013

My sweet nephew was born at the end of November. Since I started quilting, I’ve enjoyed making quilts for the new babies who’ve joined our family. I typically try to get the quilt made by the time each baby is born, but since Micah’s mom and dad wanted to be surprised by his gender at birth, I didn’t get this quilt finished before he was born. In fact, after he was born, Christmas gift sewing was in full swing so sweet little Micah had to wait a couple months before getting his quilt.

My sister-in-law told me she likes chevrons right now. So I decided to follow Leigh’s tutorial for making chevron blocks out of flying geese. After playing around with the layout a bit, I decided I wanted something a little different. Here’s what I came up with.

Micah's Quilt

I used a variety of prints from several fabric lines. I used the two Riley Blake Wheels prints that I had leftover from these two quilts as my focus fabric and then pulled other prints that I think go well with Wheels. I used Kona Coal for the background fabric.

On the back, I used my last piece of the Wheels collection along with some Alphabet Soup, Hope Valley, Blush, and that orange print. (I’m not sure what line it’s from. It was one of the fat quarters that came in the Pink Castle Fabrics’ Stash Stack Club.) The binding is Ovals in aqua from Half Moon Modern.

Micah's Quilt

I quilted loops in the gray background only, which was fun and really helps the colors pop.

Micah's Quilt

This baby quilt measures about 36 inches square and will be gifted to Micah on Sunday.

Sunday, January 6, 2013

Finished BIL and SIL Quilts

Every year for Christmas on the mister's side, we draw names for a gift exchange. Each grandchild gives to another grandchild and then the adult children/siblings give to each other. Last year, we had the mister's sister and I made her this Color Beads quilt. I decided then that I want to make a quilt for each adult whose name(s) we draw. So this year, we had the mister's twin brother and his wife for Christmas. As an extended family, we've set a limited dollar amount for gifts, but a friend was getting rid of some fabric that just happened to be the perfect colors for my sister-in-law, so I was able to make both my brother- and sister-in-law quilts.

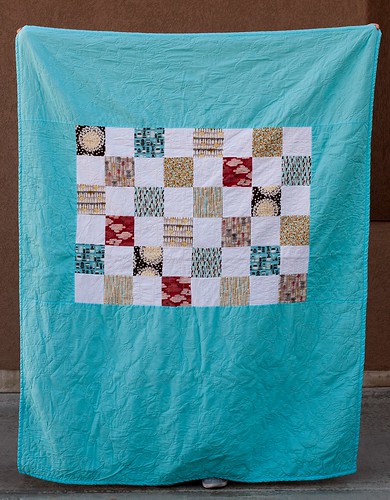
First up, my brother-in-law. He's really smart. Like super high IQ and even back in high school, I remember him liking chess. I wanted to use a charm pack of this Cloud 9 fabric that we got at Sewing Summit, but since there weren't very many charms, I added some charms of Kona white and gave it a chess/checker board feel by alternating the print fabric and the white charms. To keep within our dollar limit, I offset the center patchwork with a bright blue sheet that I had on-hand as the border.

DSC_3400

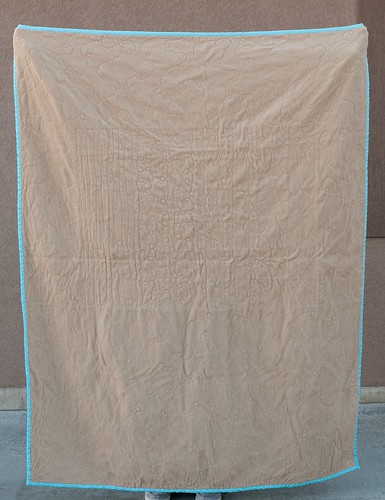
I backed it with a fleece throw that I got Black Friday shopping. I also wanted to experiment a little since I'd never used this as a backing before. I didn't add any batting and it really gave this quilt more of a blanket feel to it.


DSC_3402

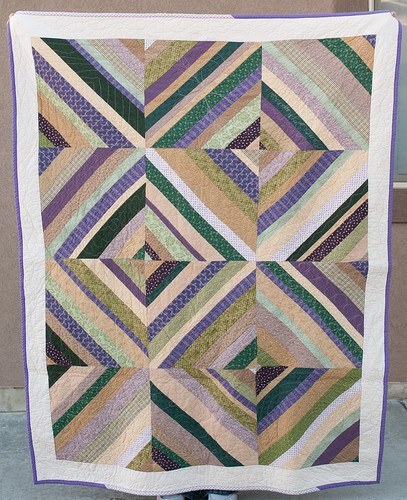
For my sister-in-law, I used these various purple, green, and cream fabrics to make large 16" finished string blocks. I played around with the layout and liked this one the best.

DSC_3405

I added batting to her quilt and while it made the quilt really heavy during the quilting process, I prefer the added weight. It made it feel like the quilt had substance while my brother-in-law's felt a bit flimsier.

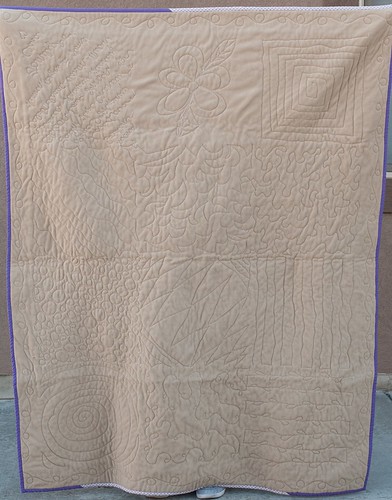
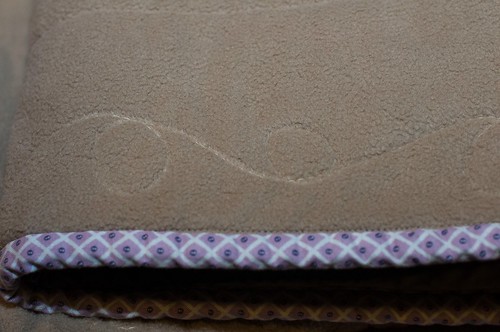
I also used her quilt to practice some new free-motion quilting techniques. I did a different design in each block. Some turned out great. Others a little meh. I used the same fleece throw for the backing and it really shows off the quilting nicely.

DSC_3409

In the border, I quilted these big loops. I really liked how the border turned out.

DSC_3424

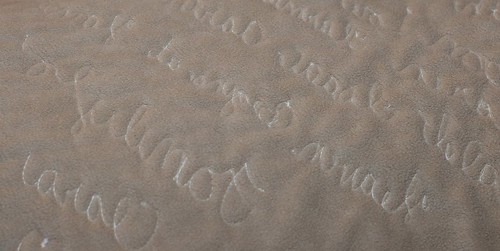
In this block, I free-motion quilted a bunch of words about family and love as well as her full name and the names of her husband and kids. This was a first for me, and I was really pleased with the result. (Since the quilting showed up so much better on the back, that's what the picture is of. Unfortunately, the writing is in reverse.)

DSC_3422

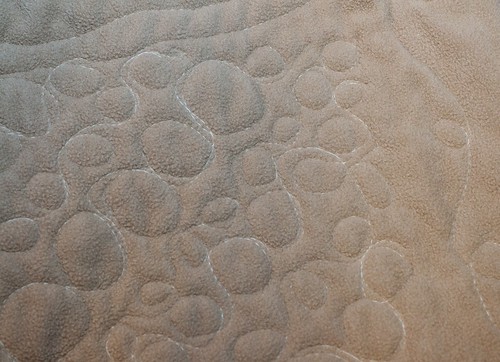
In this block, I did a little pebble quilting, basing the size of the pebbles on the width of the strips I was quilting. I really like the varying sizes all together on the diagonal like this.

DSC_3428

Both quilts were well-received. It will be fun to continue this tradition next year with another set of siblings-in-law. Hopefully the mister's remaining brother and sister are okay getting quilts from us for the next couple years.

Saturday, November 24, 2012

Finished Spring Carnival Kona Solids Pillow

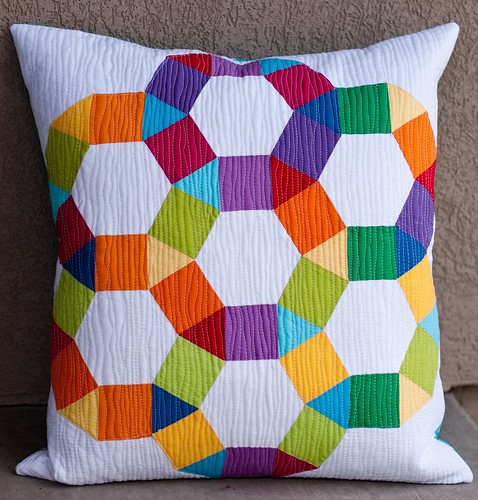
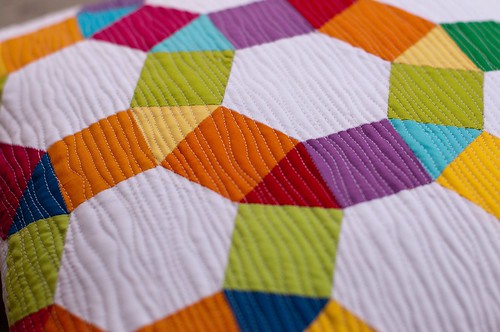
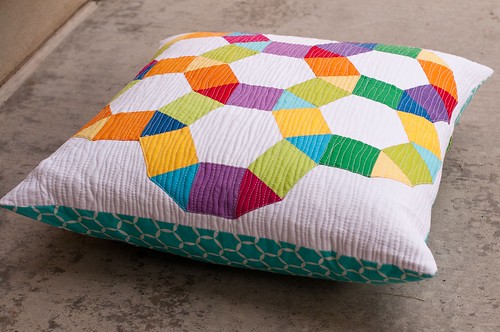
At Sewing Summit last month, I started this English paper pieced (EPP) Spring Carnival pillow in Katy's EPP class using a charm pack of Kona cotton solids in the bright colorway. I finished it up just before Thanksgiving, and I must say that I love how it turned out.

English Paper Pieced Spring Carnival Pillow

I wanted to quilt this pillow pretty densely so I pulled out my walking foot and set to work quilting in organic straight lines. After 30 minutes or so (I didn't really time it, but it felt like forever), I had only quilted about a 2-3 inch wide section. Ugh. This was going to take a while. So, I set the pillow aside to work on other, more pressing projects. A few days later, I pulled it out again after freemotion quilting (FMQ) on an apron for my husband's aunt to give my mother-in-law and thought I'd try straight-line quilting with my freemotion foot. Huzzah! It was so fast and slick and awesome! I finished the rest of the pillow in the same time it took me to do those 2-3 inches with my walking foot. Definitely a new favorite FMQ technique that I'm sure to use over and over.


English Paper Pieced Spring Carnival Pillow

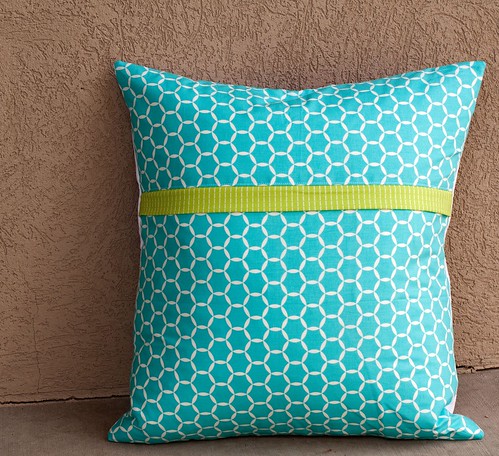
For the back, I made another hidden zipper enclosure. I love that the pattern of the back fabric sort of mimics the design on the front. I can't remember the name of this fabric off the top of my head, but I picked it up during Sewing Summit and thought that'd be fitting too. The green zipper flap is Patty Young's Running Stitch in green.

English Paper Pieced Spring Carnival Pillow Back

I've entered this pillow in Pink Castle Fabrics Fall for Solids contest over on Threadbias.

English Paper Pieced Spring Carnival Pillow

Linking up to Kati's At the End of the Hallway.

 
Oh, and I wanted to mention that I survived my first-ever Black Friday shopping experience! My sister has vowed to never go again (once was enough for her), but another sister happily offered to do it again with me next year. I hope you all had a wonderful Thanksgiving and weekend!

Thursday, August 23, 2012

Two More Finished Baby Quilts (one of them made by the mister!)

A couple years ago, the mister thought it would be fun to try teaching me some photography tips. He has a passion for photography and I thought it couldn't hurt to learn how to take better pictures of my sewing and quilting projects. While he was teaching me about his hobby, he thought it'd be fun to learn how to make a quilt. So, we looked through my fabric (he picked Arcadia by Sanae) and then found a tutorial he thought would be fun (Jacquie Gehring's Wonky Log Cabin tutorial). I showed him how to use the rotary cutter appropriately and then he came up with his own cutting/sewing/pressing station, which pretty much meant that the cutting mat, ironing board, and sewing machine were all set up on our living room floor so he could go from one station to the next with only rotating his torso. He used his knee to push down the pedal as he sewed. I wish I would have taken a picture because it was quite the sight!

Baby Quilt Wonky Log Cabin Side

These are the four blocks he made during the first couple sewing sessions.

Baby Quilt Strip Side

After making those blocks, he got busy and distracted by other things and they were put aside for a couple years. However, two of his coworkers got married to each other a couple months ago and are expecting their first child. The mister wanted to pull out the blocks and finish a baby quilt to give to his friends. As the first few blocks took a bit of time to make, he wanted to switch gears and use a design that he could make in an evening. So, I helped by cutting the fabric and he sewed them into strips. He did all the piecing and pressing. He even spray basted the quilt, straight-line quilted it, and attached the first side of the binding.

IMG_20120813_190045

He did such a great job and I'm so proud of him. He took the quilt to work a couple days later (I had to show it off at the SLMQG meeting of course) and gave it to the husband/soon-to-be-dad in the break room. I wish I could have seen it! The mister said his face turned all red as he handed over the quilt to his coworker in a room full of people. Priceless!

Earlier that day, I was working on this baby quilt. When my partner sent me the pillow she made for me in round 7 of the Pillow Talk Swap, she included an extra purple string, paper-pieced star that didn't end up fitting into her pillow design. I used that as the focal point of this quilt.

Star and Hexagon

I don't have a lot of purple in my stash, which is strange because I love purple for clothes, but I guess I just haven't been a big user of it in quilts. Anyway, I managed to find some purples that worked well with the star as well as the solid that I picked up from Joann's: Kate Spain's Central Park, Lizzy House's 1001 Peeps, and Joel Dewberry's Heirloom. I used strips from each of those prints to make the binding as well. (That darn breeze wouldn't let me get a flat picture of the quilt!)

String Star + Hexagon Baby Quilt

On the back, I just pieced a simple improv block using some of the scraps from the front and then offset it with the purple solid.

String Star + Hexagon Baby Quilt Back

I also tried a new thread on this quilt. First, I used my typical piecing and quilting thread (but in gray instead of white), which is a 100% cotton machine quilting thread from Joann's. I'm not sure the brand, but it comes in a hefty size on the spool. I also wanted to try out Superior thread so I ordered a sampler pack a few weeks ago and one of the spools they sent me happened to be a dark purple that matched the purple solid in this quilt perfectly. And, just like in my last post, I tried some more new-to-me quilting designs. They're not even or consistent or great to say the least, but I kind of like them. They're "homey" and give the quilt a handmade feel that I like. Plus, practice makes perfect, right?

Untitled

This quilt will be finding a home with a new little baby soon-to-be born.

Monday, August 20, 2012

Single Girl with Retro Flowers - A Finished Quilt. (Oh, and anniversary celebrations too.)

Way back during round 7 of the Pillow Talk Swap, I played around with the idea of combining the Single Girl pattern (by Denyse Schmidt) with the Retro Flowers pattern (by Christina, The Sometimes Crafter). When I showed my three ideas in the Flickr group, my partner picked a different design as her favorite so I decided to turn this pillow top into a quilt top by setting it a bit askew and adding some borders.

Single Girl Meets Retro Flowers Quilt Front

I used a bunch of scraps and then added Kona Bahama Blue and Stone as well as Albert and Victoria books for the top and backing. For the binding, I used a blue plaid from Riley Blake's Play Ball line.


Single Girl Meets Retro Flowers Quilt Back

I've also been trying to break out of my quilting style a bit by trying some new things from Angela Walter's free-motion quilting book. I thought this quilt would be a good one to practice on.

Single Girl Meets Retro Flowers Quilting Detail

I finished this one up just in time to give to my friend who's been in the hospital on bed rest with placenta previa. She made it to 35 weeks (hooray!), so her doctors say she can have the baby any time between now and 37 weeks so she doesn't run the risk of needing a blood transfusion.

***

A few posts back, I mentioned some anniversaries happening around here. My parents celebrated their golden, 50th anniversary! My sister made a cake for their special day. Not only did it look great, but it was absolutely delicious! We set out some photos and cards too. For their gift, we made them a voice quilt. Family and friends placed calls that were recorded and then we compiled all the messages onto a CD that my parents can listen to whenever they want.

Mom and Dad's 50th Wedding Anniversary

My dad is in poor health, so it was the perfect way to celebrate.

Mom and Dad's 50th Wedding Anniversary

The mister and I also celebrated our 9th anniversary. We headed downtown and went to the place where we got engaged. We reminisced about our engagement and gave each other "new" rings (we got mine resized and got a new one for him that fit...sometimes marriage makes you comfortable and you gain weight, making your rings not fit you anymore).

Celebrating our 9th anniversary

We went to dinner then caught a double feature before turning in for the night. The next morning, we ate brunch at The Grand America in Salt Lake. I'm telling you, if you ever get a chance to have Sunday morning brunch there, DO IT! So, if you're coming into town for The Sewing Summit, head across the street to the Grand America and stuff your face with really good food. You won't regret it.

Saturday, August 11, 2012

A few random sewing projects, part 2

Tuesday was my anniversary. The mister had to work late, so I thought I'd start a new EPP (English paper piecing) project just for me. I pulled out Katy's Spring Carnival printout and templates and set to work. I'm using some Joel Dewberry Modern Meadow fabric that I've been saving for a while to make a pillow or two for my new couch. Since taking this pic, I've changed my mind on the brown print. I'll be using white for those triangle sections.

Katy's teaching a class on this design at The Sewing Summit in the fall. I'm crossing my fingers that I can take it while I'm there.

spring carnival

I have also been brainstorming some ideas for baby quilts. Two of my sisters-in-law are having babies in the next couple months. One of my good friends is in the hospital right now on bed rest and as a precaution due to placenta previa. I'm thinking I'll make a giant granny squares quilt for her soon-to-be-born little girl using some charms from Kate Spain's Central Park line.

giant granny squares baby

I bought a couple more quilting books as well. I really enjoyed flipping through these books. I've been a fan of Jacquie Gehring since I started quilting and I love how she and Katie Pedersen teach the techniques behind the quilts they show in the book, rather than just the pattern for the design. I think this approach is generally more helpful when you're trying to develop skills and a greater understanding of quilt construction.

20120726-20120726-DSC_9585

I'm a new fan of Angela Walters. I've never loved the quilting part of making quilts, but I think Angela has done such a great job of illustrating how to go about expanding your quilting skills. I'm excited to try more techniques from her book.

20120726-20120726-DSC_9583

And here's a little sneak peek of the quilt I finished last week. I was inspired by Angela's book and tried out a few new quilting designs. They certainly aren't perfect, especially when my nose was an inch away from the quilt, as Angela puts it. But, when you stand back and look at the overall quilt, you can see how I actually put some thought into the quilting.

sneak peek

I'll share more of this quilt next time. I'm off to celebrate my anniversary with the mister. Have a good weekend!

Friday, June 8, 2012

EZ Dresden Tutorial and Giveaway - Color Cog Mini Quilt

***This giveaway is now closed.***

Welcome blog hoppers! I hope you're enjoying the blog hop as much as I am. There have been so many tutorials that have had me thinking, Why didn't I come up with that?! and I didn't know the ruler could do that!

For my tutorial, I'm going to show you how to put together a staggered, strip-pieced dresden like my Color Cog mini quilt.
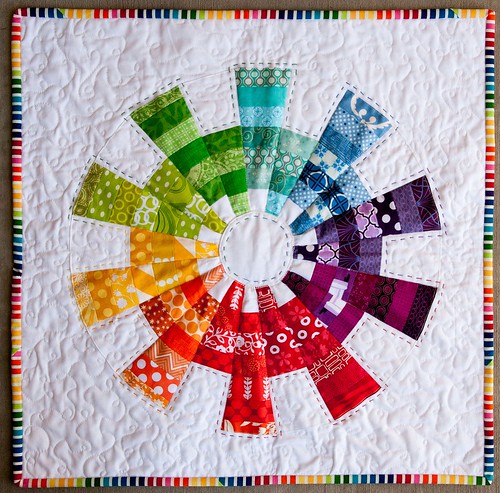
Finished EZ Dresden Challenge Mini Quilt

Since the EZ Dresden ruler requires 20 blades to make a full circle, and since there are 12 colors in the traditional color wheel, you'll need to omit two colors (four blades) to achieve a full circle. (I left out blue-purple and I combined yellow with yellow-orange.)
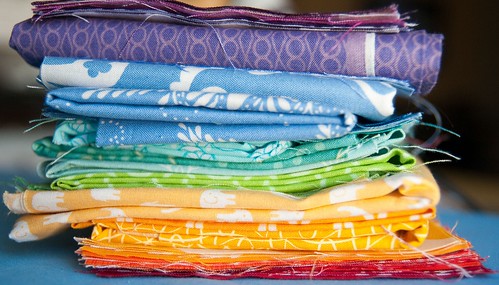
EZ Dresden Challenge

Start by cutting at least six strips that measure 1.5" x 5" for each color. This will yield two blades. You can have anywhere from two to six different fabrics. (I varied between four and six.) You'll also need a background piece that measures 3.5" x 5" for each color, so a total of 10 rectangles. I used Kona white. The image below shows only four colored strips, so just pretend there are six strips shown.
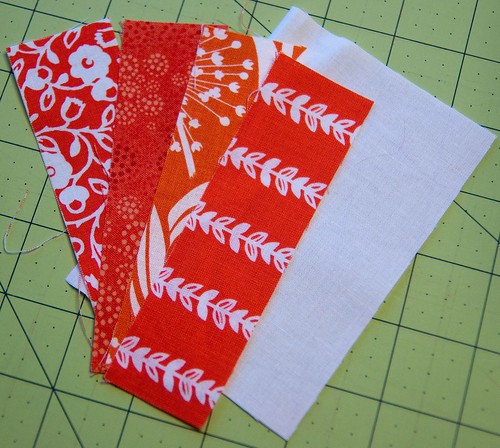
EZ Dresden Challenge

Layout your strips in an order that is pleasing to you.
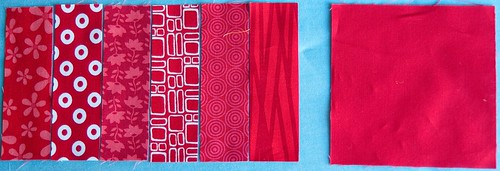
EZ Dresden Challenge

Piece the strips together and press the seams open or to the side. I found that pressing them open helped since there are so many pieces in this mini quilt.
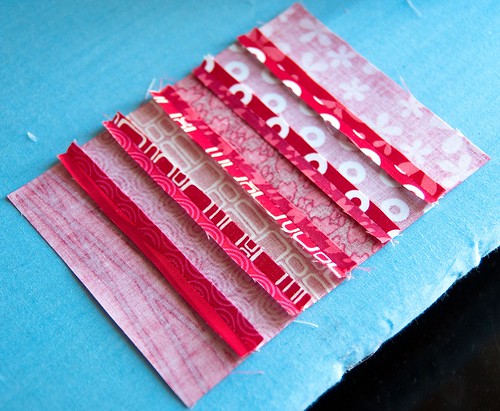
EZ Dresden Challenge

Next, take your EZ Dresden ruler and line up the top of the ruler with one end of your pieced strips near the left edge if you're right-handed or near the right edge if you're left-handed.
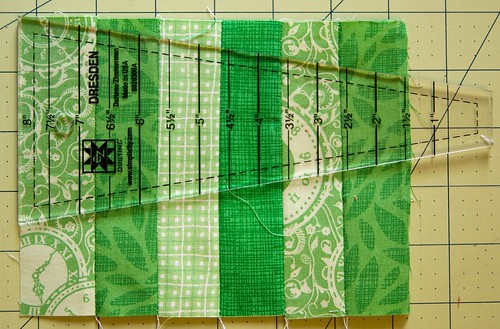
EZ Dresden Challenge

With your rotary cutter, make a cut on the side with the greater amount of fabric outside the ruler. Then cut on the other side.
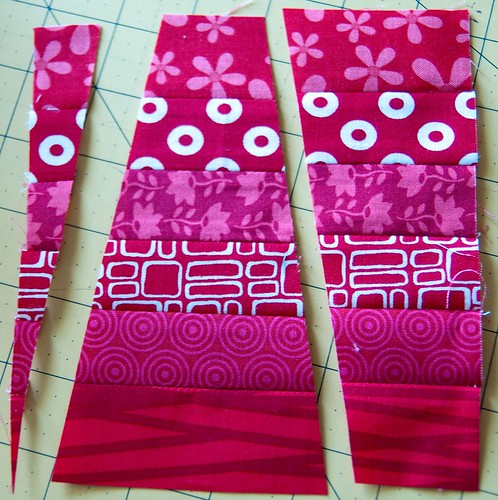
EZ Dresden Challenge

Turn your ruler around and line up the opposite end of your pieced strips with the 5" mark on your ruler. Cut the remaining side and the bottom (narrow) edge.
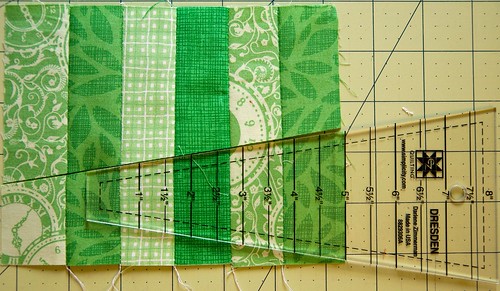
EZ Dresden Challenge

You should now have two sizes of blades. Repeat the previous steps for all your colors. You should now have 20 blades, 10 of each size.
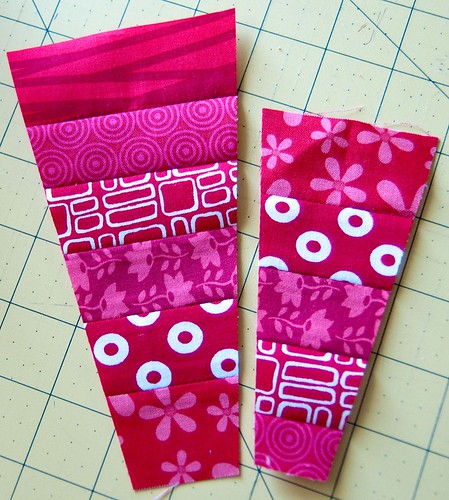
EZ Dresden Challenge

Now, take your smaller blade and your 3.5" x 5" background piece and lay them right sides together as shown below, off-setting about a half inch of the background fabric.
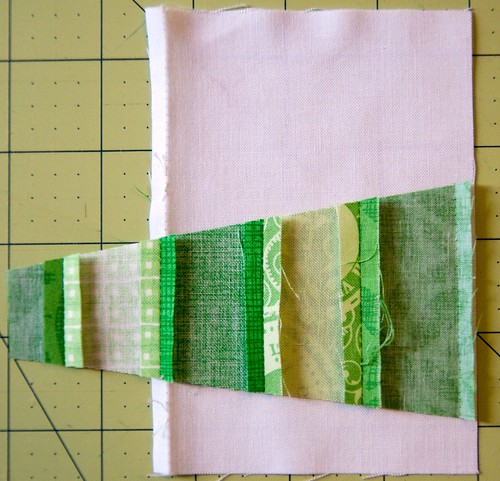
EZ Dresden Challenge

Stitch along the longer edge and press your seams open. Repeat with your nine remaining smaller blades.
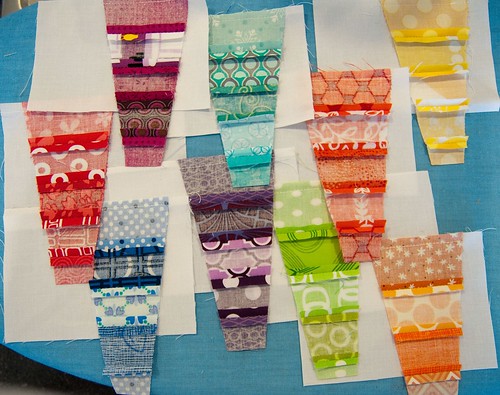
EZ Dresden Challenge

Lay your ruler on your smaller blade, aligning the narrow end of the ruler with the smaller end of your pieced strip. The pieced strip and the ruler should match up pretty well end-to-end.
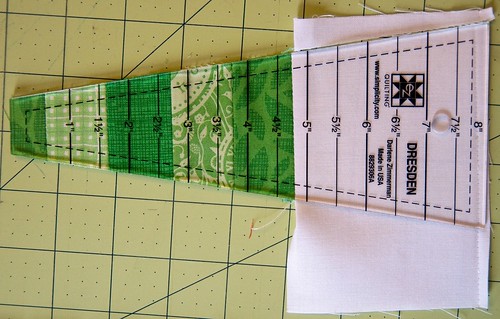
EZ Dresden Challenge

Cut on either sides of the background piece to get your 8" blade.
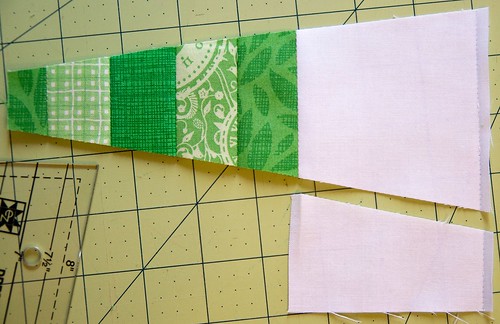
EZ Dresden Challenge

Take the leftover background piece from the previous step and place the wider edge along the narrow edge of your longer blade, right sides together.
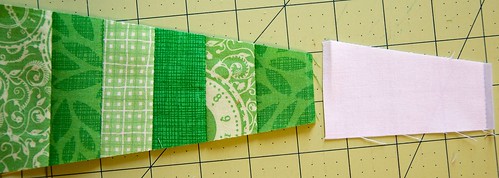
EZ Dresden Challenge

Stitch in place and then press your seam open.
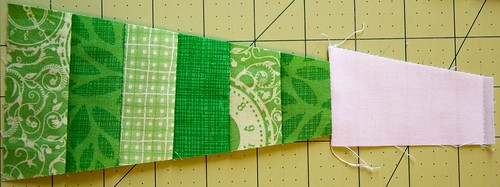
EZ Dresden Challenge

Place your ruler on top of your fabric, making sure to align them correctly. Trim the excess. Repeat with your nine remaining longer blades.
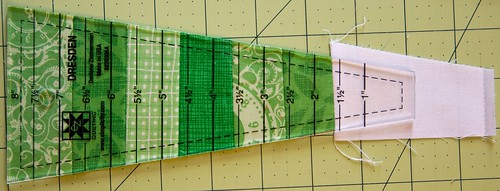
EZ Dresden Challenge

Now place the longer blade and the shorter blade side by side, matching the second to bottom colored fabric on the long blade with the second to top fabric on the short blade.
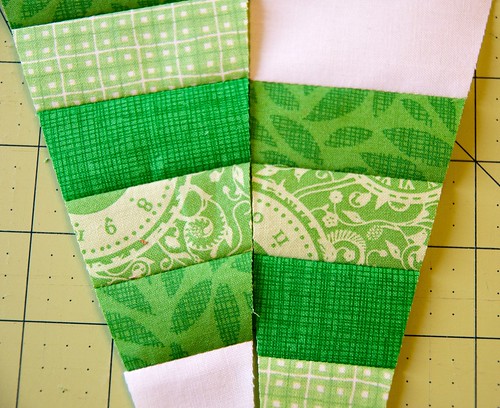
EZ Dresden Challenge

Lay all your blades side by side to create your dresden circle.
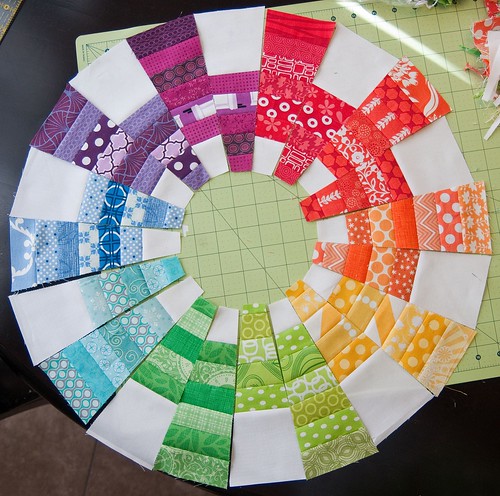
EZ Dresden Challenge

At this point, you have a couple options for piecing your dresden. If you want to use set-in seams (requiring you to piece the curve), separate your dresden circle into quadrants and piece each quadrant.
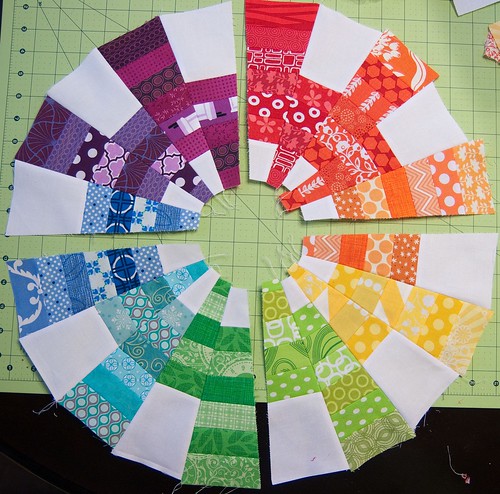
EZ Dresden Challenge

If you don't want to piece the curve, but you want a finished outer edge before appliqueing your dresden to another piece of fabric, you can either make traditional dresden plate points, or you can use Lee's fantastic idea and press the outer edge under before piecing the blades. (I wish I had thought of this!) I pieced my entire dresden, then turned and pressed the outer edge under, and appliqued it to my background fabric (Kona white). I also added another appliqued circle to cover the raw-edged circle of the dresden.

Once you've attached your dresden to your larger background fabric, you can baste it and quilt it however you like. I hand quilted around the perimeter of the cog design as well as in the center circle. Then I used white thread to free-motion quilt by machine in the background.
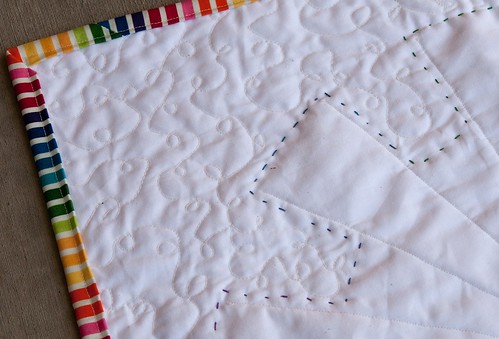
Finished EZ Dresden Challenge Mini Quilt

I also quilted in the ditch of each blade for a little more security.
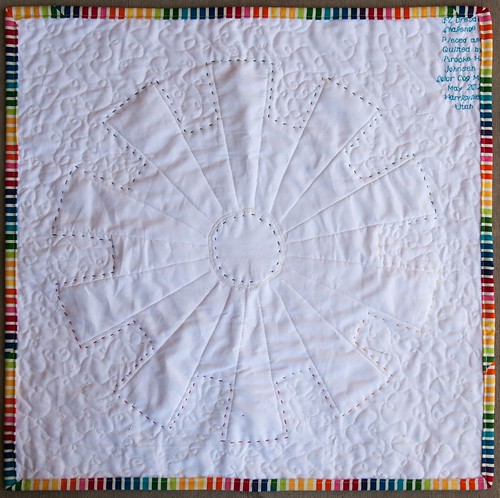
Finished EZ Dresden Challenge Mini Quilt

Once everything is quilted the way you'd like it to be, attach your binding. I used a rainbow stripe from the Remix line from Robert Kaufman to reinforce the color wheel theme.

And there you have it. A finished color cog mini quilt.

Finished EZ Dresden Challenge Mini Quilt

I hope you've enjoyed this tutorial and that it's given you some more ideas of ways to use the EZ Dresden ruler. If you'd like a chance to win one of your own, leave a comment. I'll draw a winner on Wednesday, June 13.

Also, make sure to visit the other bloggers. You can see a list of the schedule here.

LinkWithin

Related Posts with Thumbnails