Thursday, September 30, 2010

Halloween Decor: Bunting

Since my last post was of a more serious nature, I thought it was time for some lighter fare.

I've been seeing tons of cute Halloween decorations popping up in preparation for October (tomorrow - eek!) and thought I'd make some of my own. I bought this Sheri Berry Trick or Treat Street panel a little while ago at my LQS and wanted to make a simple quilt out of it for Halloween. But, after taking a look at my to-do list for the rest of the year, I knew that a quilt that would only be used for one month out of the year was not something I could afford to spend time on, so that idea quickly fell by the wayside.


However, I was persuaded to at least make something Halloweeny after browsing around online yesterday.

I pulled out the panel and started brainstorming. Ding (enter lightbulb)! I could cut up this panel and make not one project (a quilt), but four!


My image is a bit messy, but you get the idea. Today I'm going to show you the bunting I made out of the "Trick or Treat" letters on the panel and the outer "Trick or Treat" border.


On the panel, there are dotted borders around each item, which made for easier cutting. I paired the letters with 5" orange squares of fabric from my stash. (It's actually a really cheap cotton that worked great for a project like this that doesn't necessarily require the best materials.)


I put the two sets of fabric right sides together, sewed 1/4" seam all the way around, but left a 2" section unsewn for turning. Then I clipped the corners, turned the units inside out, and topstitched all the way around them.


Then I pieced the "Trick or Treat" border into one long strip and laid it face down on the squares after I spaced them how I wanted them. I folded the strip back up and topstitched the side I just sewed and then made a finished seam on the opposite side.

I really like how it turned out, but it took much longer than I anticipated. I thought I'd be able to whip this up in a jiffy and it ended up taking my entire night's worth of sewing time.


Oh, gotta run. The mister is taking the kids to the park and I want to join him.

Make sure to check out the Sew and Tells today.


Also linking up to:
Fresh Poppy Design


Wednesday, September 29, 2010

Patching Up Quilt Top

Back in August, I posted about this straight-edge whirligig/tessellation cross quilt that I was in the process of making. I pulled the blocks out a couple weeks ago and pieced them together into a baby quilt top. I needed some comfort.


Making this quilt top was so therapeutic for me. I know this is a tad personal, but since I know many of you understand how sewing and quilt making can have healing effects on you, I think it's okay to share here. A couple weeks ago I was thrilled to find out that my husband and I were expecting our third child. Sadly, I experienced a miscarriage shortly thereafter. While I was dealing with the grief that comes with a lost pregnancy, I finished this quilt top. I'm calling it Patching Up, an appropriate name for a quilt top that came together under these circumstances.


I may add an outer border to encase those blocks and give an edge for the binding so it doesn't cut off any of the blocks themselves. The back will have a strip of five blocks between two pieces of the same fabric. I figure I have plenty of time to finish this one, so it will likely be something I work on here and there for a while. I'll continue to post my progress as I work on it.

Tuesday, September 28, 2010

Finished Rocket Me to the Moon

During my time off work last week, I finished the quilt for my son's bed, Rocket Me to the Moon.

I knew I wanted to quilt this one with something other than all-over loops, but it took a little while to decide exactly what I wanted to do. I started by outlining each square with a stitch about 1/4" inside the square on all sides. Then I was going to quilt the blue sashing only. But, then I thought it would be more fun to free-hand stars, planets, moon rocks, and an alien robot within each square instead.

Here are some moon rocks (free-motion pebbles).


Here are some stars.


The planet Saturn on the front.


And how it looks on the back.


And finally, a little alien robot on the front.


And back.


When I finished quilting all the squares, I almost left it at that, but then felt like the sashing was missing something. So, I quilted some wiggly lines vertically and horizontally along every sashing line. I like how it gives each square its own frame.


I bound the quilt in the same rocket wave fabric as the large squares on the quilt top and the waves make nice wavy stripes on the binding.


While the quilt was washing and drying, I made a matching pillowcase with the last of the rocket waves fabric. It was lacking a little something on the end so I appliquéd the same rockets that are on the back of the quilt and on the curtains in my son's room.


I wanted to get a picture of the entire quilt, but the grass was wet this morning and I don't have any helpers today to help me hold the quilt up. Oh well. You get the idea.


Be sure to check out Fabric Tuesdays today.

Fresh Poppy Design

Sunday, September 26, 2010

The auction was a success!

I've been busy the last few days spending time with my family as the mister and I both had time off work. I finished my Rocket Me to the Moon quilt and I will post pictures of that soon. I just wanted to let you all know why I've been MIA for a while.

The kids spent Friday night at my in-laws' and imagine my surprise when we arrive Friday afternoon to drop the kids off and my mother-in-law tells me that she won the charity quilt at the silent auction the night before! What a small world. The funny thing is that I made her a simple quilt out of the same fabric (Frolic) over the summer as a house-warming gift. Hopefully she doesn't get Frolic-overload, but at least the quilts will match.

Monday, September 20, 2010

Finished Charity Quilt

First off, I just wanted to say thanks to all of you who have left comments about this quilt (through its many phases), and the Rocket Me to the Moon quilt. I've meant to reply to all your comments, but life has been pretty hectic for me and I won't be able to respond. But I do want all of you to know that I appreciate your kind words...they are great motivation for me.

I finished the charity quilt last week in time for the auction, but they ended up pushing the auction back a week. That was nice because then I had something to take to show and tell at our monthly quilt guild meeting.


I did all-over swirls for the quilting. I'm trying to work on moving the quilt at a consistent speed and I think I'm improving a bit. At least my stitch-length is starting to look more even.


I cut 3" strips for the binding this time. I also took greater care to make sure my lines were as straight as possible. I do my bindings backwards than most of you, I'm sure, but I think this works for me. The mitered corners turned out quite nicely.


This was a fun project to work on, but I'm glad it's done. The other day I made a list of everything I'd like to quilt and the list was over 30 items long. I prioritized the top ten that I'd like to have done before Christmas. As this quilt was on the list, I'm happy to cross it off and move on to the next one.


I have a few days off work this week so I'll be attaching the binding to my Rocket Me to the Moon quilt and it will be ready for my son's bed. That'll shorten my list to eight to-dos by December.

Thursday, September 16, 2010

Lunch Sack and Reusable Snack Bags

I haven't shared much personal information on this blog, but this week my son started at a new preschool. He has an Autism Spectrum Disorder (ASD) and started at a school that is specifically for kids on the autism spectrum. Technically, my son has PDD-NOS, or Pervasive Developmental Disorder Not Otherwise Specified. This basically means that he has some challenges typical of autistic children, but he doesn't have all of the classical traits. He can talk and communicate, which is one of the reasons this school wanted him to attend there, but he often struggles with certain behaviors and has a few sensory problems (like getting his hair cut and brushing his teeth).

aDSC_0092

Anyway, instead of going to preschool a couple days a week for a few hours a day, the bus picks him up at 8 in the morning and drops him off at 3:30 in the afternoon. That means he eats lunch away from home. He's a pretty picky eater (aren't most kids?), so I figured it would be worth it to make lunches for him.

I try to be environmentally conscious so I knew I wanted to make a lunch sack with reusable sandwich bags. I was looking for tutorials and came across this one at A Lemon Squeezy Home. Totally adorable! My son loves anything to do with cars and trucks so he picked a bus for the design on the front. I've been wanting an excuse to buy some Wheels fabric by Riley Blake and this was the perfect project for it.

Here's my not-anywhere-near-perfect version. In my head, the bus was going to turn out so cute, but instead the front tire looks a little flat and I should have probably picked a more symmetrical object for the front flap. But, oh well. Mistakes to learn from.


I appliquéd the windows and wheels onto the front, used PUL for the lining (the same thing in the cloth diapers I have), and added my son's name on the back. It took a while to make it, a few hours I think. But, at the end of the day, my son was happy with it. He made up a little song that he sang about loving his bus lunch bag. Can't ask for a better response. And even though it's not perfect, if he likes it, that's all that matters, right? (Although you can be sure that I'll be making a couple more to try to improve my skills.)


I also made several sandwich/snack bags. I used the same two prints for these as I did in the lunch sack, but in different colorways. Two have velcro and I used this tutorial for those. The other two are just the plain old fold-over kind, but I had to figure that one out as I went along. All the bags use the PUL. If I make more, I'll modify the tutorial I followed so there are no raw edges on the insides of the bags. I can see those catching crumbs easier.


The velcro version was easier and quicker to sew than the fold-over version. Although, I bought self-sticking velcro and couldn't sew through it without mucking up my needle. Luckily, it's VERY sticky and adheres nicely to the PUL. I don't think I'll have to worry about it coming off for now.


I whipped 12 of these up in about an hour and a half on Sunday. Super fast and super easy.

Oh, and one more thing. Angela over at Cut to Pieces (the mastermind behind the INCREDIBLE Where Blue Birds Fly doll quilt) is giving away a copy of Cherri House's City Quilts book. Head on over and check it out.

Wednesday, September 15, 2010

A Busy Week

My to-do list for the week is a mile long. My sisters and I are having a garage sale on Saturday, my three-year-old started at a new preschool on Monday, I've been trying to finish up the charity quilt (binding to be done tonight), and I have a lot of last minute to-dos for our Super Saturday (annual Saturday craft day for the women in my church congregation) announcement this Sunday.

I also had some health problems over the weekend, adding to the stress around our house. I used sewing as therapy and made a lunch sack, reusable snack bags, and a baby quilt top this weekend, in addition to quilting the charity quilt.

But, as I haven't had time to take pictures of any of those things yet, I thought I'd show you one of the projects we may offer at our Super Saturday activity. I already showed you the appliqué tree pillow. We're having a couple of wood projects, including these countdown blocks. I made these for Halloween last year, but the women can make them for any holiday they want just by changing the scrapbook paper.


I bought a 4x4 at Home Depot, had my hubby cut it into blocks for me, and then sanded and painted them. I bought a couple Halloween scrapbook pages, and had my sister cut me some vinyl numbers. I went with a non-traditional Halloween color (blue) for the paint and really like how it turned out. Although, my sister used the same paper, but painted her blocks black and they look great.


I made countdown to Christmas blocks, but I don't love the scrapbook paper I chose. I think I'll redo them this year to match the colors of my tree (ornaments, tree skirt, etc.) rather than using the traditional red and green color scheme.

Thursday, September 9, 2010

Charity Quilt Back

I finished piecing the back of the charity quilt on Tuesday and got the quilt basted last night. I normally wouldn't do so much piecing, but I didn't have enough yardage for a solid backing and wanted to try to pull some fabric from my stash. The only extra fabric I bought for the project was the blue swirls yardage for the borders on the top (with leftovers for the back) and the multi-squares that I used on the back.


Since I knew I didn't have enough yardage for a solid back, I started sketching out a design, using some of the leftover triangles from the quilt top. I've realized that I use a scant 1/4 inch seam. That's definitely something to keep in mind when I sketch designs out in the future.


I pulled this orange from my stash, which was leftover from a pillow project earlier in the year. The two shades of orange work well with the oranges in the Frolic line. After piecing this together, it looked like a cute little table runner. I don't use them at my house, but it gave me even more ideas for Christmas presents (like I need more ideas...I already have too many ideas for projects than time to get them made before Christmas).


Here's my little helper trying to hold up part of the backing. (He's starting all-day preschool on Monday and I'm going to be making him a cute little lunch sack and matching reusable sandwich/snack bags - more on that to come.)

The brown is a Kona cotton (I can't remember the exact color) that I bought months ago to go with the jellyroll sampler quilt. Since I didn't end up making the full 12 blocks in the quilt-along, I had plenty of brown fabric to spare. It matched the Frolic line pretty well, but also reminded me of a pair of polyester pants my grandma used to wear.

There's a thin strip between the bottom blue and brown strips. It was a leftover jellyroll strip that I didn't use for the top so I cut it in half lengthwise to add a little separation between the blue and brown.


Do you remember my label debate? After much thought, I decided to go with handwritten labels for a couple reasons. One, it's easier to personalize the quilt because I can write the name of the quilt and who the quilt is for. And two, I think it will be neat to preserve a bit of me in my handwriting. As an added bonus, it will be good to practice my hand-drafting skills that I haven't really used since my interior design college days.


I hope to start the quilting tonight. If I plan this right, I'll be able to finish up the quilt by the first of next week and hand it off to my brother-in-law for the auction.

Linking up:


Tuesday, September 7, 2010

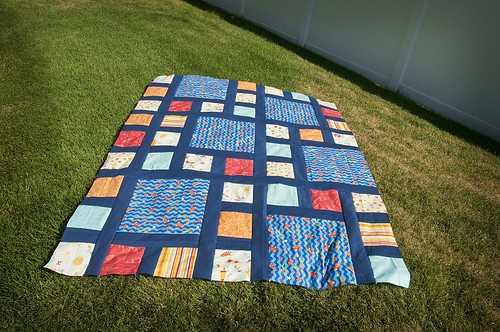
Rocket Me to the Moon Quilt Top

Remember last weekend when I said I got three quilt tops done in three days? Here's the last of the three, minus the outside border that I've since added.

Rocket Me to the Moon Quilt Top

Way back when I first started quilting, I made this quilt top for my not quite three-year-old at the time. I was so proud of myself. I appliquéd those little rockets on there and thought I was the beezneez. But, as I learned more about quilting (like not using 1/2" seams, which is what I did here), I realized that this quilt top was crap. I tried to think of ways that I could salvage it, but everything I thought of required more work than I wanted to put into it. I'm also a cheapskate when it comes to most things and couldn't stand the thought of tossing it out. So, I decided to turn it into the backing and make a new quilt top.

I bought some Rocket Wave fabric by Michael Miller. I initially planned on just making a quilt top mostly out of that fabric without too much piecing. Then I saw these blocks by Amy of Diary of a Quilter and had to pick up these other rocket/space fabrics by David Walker to add to the quilt top. I was perusing a quilt magazine (sorry, I can't remember which one) and saw a quilt with this design (can't remember the name of it either) that I totally loved and thought it would be nice and boy-ish with these fabrics for my now three-and-a-half-year-old.

Rocket Me to the Moon Quilt Top

The colors aren't exactly the same as what I've already used in his room (like for his curtains), so I used the navy blue fabric as the sashing to tie the colors together a bit more.

I finished the quilting yesterday and need to bind it. I'll post more photos of the final product soon, along with matching pillows and pillowcases. For now, it's on hold so I can finish up the charity quilt. It's due a week from tomorrow and I still need to finish piecing the back (an update on that coming soon), baste it, quilt it, bind it, and wash it! Ack!

Linking up:

Fresh Poppy Design


LinkWithin

Related Posts with Thumbnails