
First, you need to determine the size of blocks you want to make. I wanted 4" finished blocks so I could easily make them work with a 16", 20", or 24" pillow form. You'll need to adjust the size of you paper if you want larger or smaller blocks.
Start with a 4x4" piece of paper. Line your paper up on your cutting mat and then begin drawing the following lines by rotating your ruler around the square.
Top left to bottom right - one inch in from both sides:

Top right to bottom left - one inch in from both sides: (this image also shows my drawn line top left to bottom right of one inch down and one inch up)
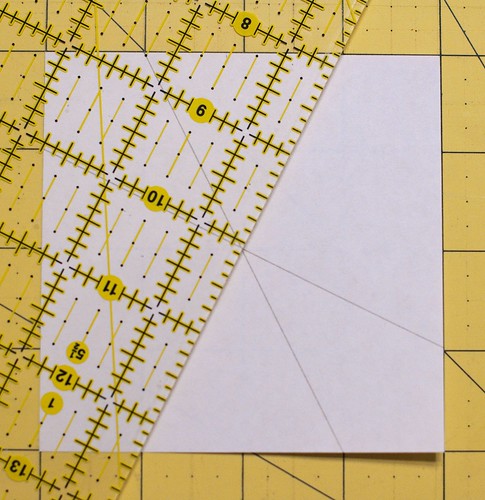
Top right to bottom left - one inch down and one inch up:

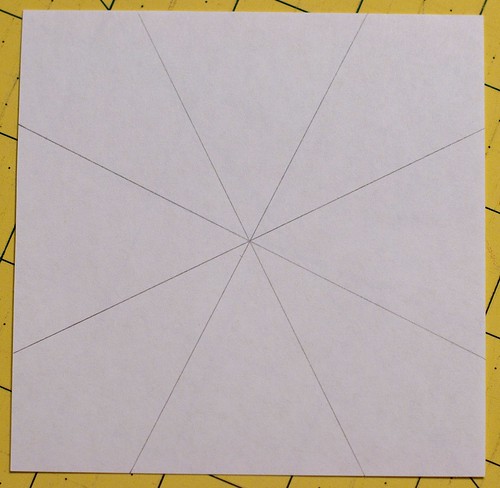
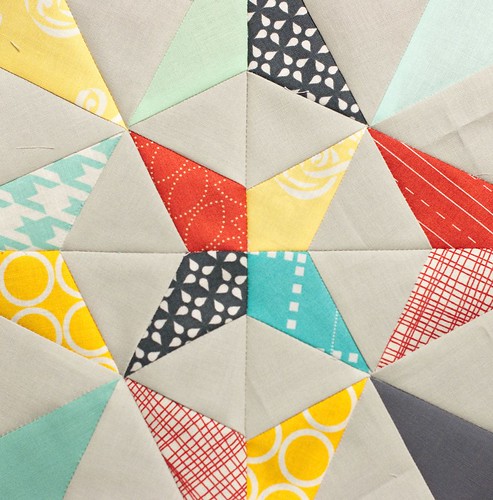
Your finished block should have four criss-crossing lines on it and should look like this:
Next, align your ruler with one of the drawn lines (it doesn't matter which one), and cut the square into two halves.
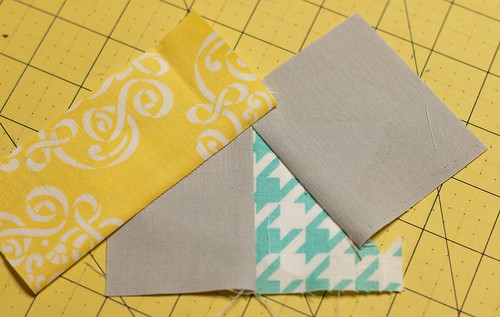
Then, paper piece your desired fabrics onto one half of the paper. Since we used a 4" square, which is our finished size, make sure you have plenty of fabric on the outside edges of the paper for trimming. For paper piecing basics, check out this post or do a web search for "paper piecing" (not to be confused with "English paper piecing") - there are plenty of posts and videos out there to help you if you've never tried paper piecing before.

Repeat with the other half of your 4" square.
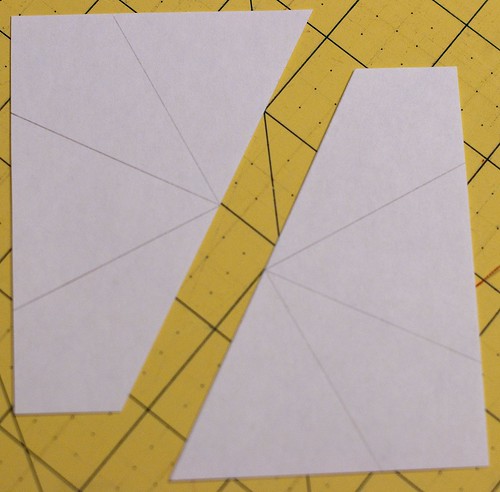
Now it's time to square up both halves. Place your 1/4" mark on your ruler on each edge of the paper and trim. This is your seam allowance.

Each trimmed half should look like this:


Align your two halves so the long diagonal edges of each paper match up, right sides together. Stitch just along the edge of the paper. (Sorry, I forgot to take a picture of this.)
Press your seams and remove the paper on the back. Here's what your finished block will look like:

You can then repeat the above steps to make as many blocks as you like. Arrange the blocks as desired. Sew the blocks into rows and the rows together to make a pillow or quilt top.
For my PTS9 pillow, I made 16 blocks and laid them out in a 4x4 layout. I then added a thin white border and then a thicker border to achieve my desired pillow top size.
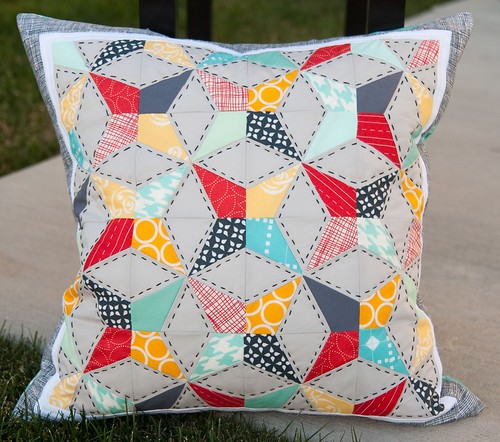
I was really pleased with how this pillow came together. I really want to make a quilt using this technique, but with larger block sizes. Perhaps that's something to put on 2013's to-do list.
42 comments:
What's this "really pleased" business? Your pillow is super-swoll-fabulous!!
Perfect! Thanks for the tutorial!
Thanks! I've always wondered how to make that block on my own :)
This is really lovely!
Thank you so much for taking the time to do this tutorial. It's great and definately a must do :)
Beautiful pillow! What a lucky partner and thanks for the tutorial!!
Great tutorial!
Gorgeous, gorgeous, GORGEOUS! And I love your tute, I'm sooo going to have to try it.
I love love love this pillow and thank you for posting a tutorial.
Love this tutorial Brooke! Totally using it.
Oh My Goodness, this is stunning and your photo tutorial makes it actually look doable for a beginner like me. THANK YOU! I have to try this!
WOW. WOW. WOW.
Hello, I've come from Craft Gossip. Thank you for the tutorial.
Beatrice.
This is so pretty, thank you. I might try it, but maybe create a template and print out a bunch rather than hand-draw each one.
Love, love, LOVE this pillow! It is so freaking cute!
Wow! This is gorgeous!
Beautiful pillow and thanks for showing how you made your PP template!
hello how are you
gusro me much this cushion
grace for the tutorial
you have good week
besossssssssssssssssssssssssss
hello how are you
gusro me much this cushion
grace for the tutorial
you have good week
besossssssssssssssssssssssssss
Thank you so much for this tutorial! I just used it today for a swap project!
Oh my! I am so glad you shared this pattern with us! I am so amazed by how fabulous this kaleidoscope design is.... Pinning! For sure!
hugs x
Crystelle
Crystelle Boutique
thank you for this tutorial! going to tackle one of these in April! love the crispness.
Thank you so much for this tutorial it really is wonderful and I never ever thought of making my own paper pattern.
ThanksBrooke! I love this! Hope to do it soon!
I pinned it! I hope that is ok with you...
What do I have to do to draw a larger block?
Just found your tute and it's exactly what I need. Thank you so much for sharing - now I know how to do it!
I know you shared this a looooong time ago, but do you know what fabrics you chose? I love what you used together. I'm just getting into quilting and pieced my first one (just a SUPER simple jelly roll) last month. I'm taking a class in a few weeks to make a lantern quilt (paper piecing). I've been looking online at what colors/prints draw me that I think would translate well. Plus, I need to think about smaller prints that will show for the small pieced pieces. I love what you used here and looked in your tute and in the comments but didn't see any mention. Thanks for any help!
I really enjoyed reading this post, I always appreciate topics like this being discussed to us. pinecrest tutoring Thanks for sharing.
This such a comfortable pillow. This such a unique Paper Pieced Kaleidoscope Tutorial.Vero Beach Tutoring Thanks for sharing this great idea.
This is a great inspiring article.SAT Tutor Gulf Stream I am pretty much pleased with your good work. You put really very helpful information. Keep it up. Keep blogging. Looking to reading your next post.
This is really informative blog for students, Sunny Isles Tutoring keep up the good work.
It seems like an educational blog which always some new information to visitors Palm Beach Tutoring and Enjoying every little bit of it and I have you bookmarked to check out new stuff you blog post.
Very good stuff with good ideas and concepts, lots of great information and inspiration, both of which we all need, Boca Raton Tutoring helpful information.
Thanks a lot for sharing. St. Augustine Tutoring Will check back later for more of your articles.
This is really informative blog for students, Special needs Tutor Westport keep up the good work.
Thank you for the work you have put into your nice blog. Special needs Tutor Larchmont We will bookmark to your blog because it is very informational. We love the site and will come back to see your new posts.
This is very nice blog because information provided here through the article and the pictures are very effective. Special needs tutor Sag Harbor Because sometimes words cannot explain the things that pictures can and here the words and pictures both are expressing the things in balance.
I saw a hack once where someone said that the Dollar Tree flexible cutting mats make excellent DIY templates. I will have to try...cheap and reusable
You made some decent points there. I looked on the internet for that problem and located most people will go in addition to with the web site.
percetakan murah di jakarta
percetakan murah jakarta timur
percetakan online Jakarta timur
jasa percetakan jakarta
digital printing Jakarta timur
digital printing online timur
percetakan murah Jakarta timur
cetak murah Jakarta timur
cetak online Jakarta timur
Hello! Was wondering how you deal with the bulky seams when you put the two halves together? Thank you so much! Incredibly informative post with pictures that make it easy to understand. Beautiful pillow!!
Post a Comment