Showing posts with label layer cake. Show all posts

Friday, July 13, 2012

Finished Oregon Beach Quilt

Back in June when I should have been working solely on my melon patch quilt (since the deadline was quickly approaching), I got distracted by all the pictures I was coming across of Lucy's Crab Shack on Flickr and Instagram.

This is what became of that distraction. I decided I needed a quilt to take with us to the beach.

Oregon Beach Quilt

Sometimes a quick and easy piecing job works wonders when you're sewing curves or involved in another more complex piecing project.

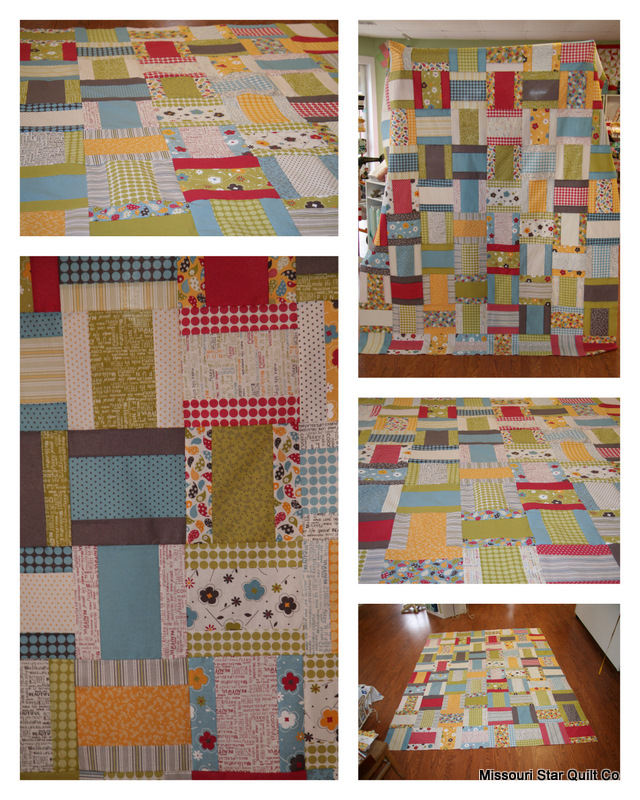
To make the quilt, I took a layer cake (42 10" squares), cut 3" squares of some Essex Linen in natural, cut the squares on the diagonal, and pieced them to opposite corners of each layer cake square. I wasn't precise at all, just eyeballing the placement of triangles. I also opted to limit them to the two opposite corners rather than all of them because I wanted an x-look rather than a snowball-look.

For the back, I used a blue plaid from the Play Ball line from Riley Blake. I think it goes well with the Lucy's Crab Shack fabrics and it was on sale (score!).

Oregon Beach Quilt

I used Patty Young's Running Stitch in Creamsicle and the plaid Play Ball print for the binding. I love her Running Stitch prints. They work so well as binding.

The quilt measures about 57x67 inches - the perfect size to warm up under while watching the fireworks at the beach! This was such a fun, quick finish. It reminded me that while I like taking the time to put a lot of work into a quilt, the quick and easy quilts can be satisfying too.

Tuesday, June 22, 2010

Finished Frolic Around the House

Here's my finished Frolic Around the House quilt, a housewarming gift for my in-laws. I was able to get this one done in record time, two weeks!


When Frolic first came out, I didn't love it. But then, Natalia brought the quilt she designed for Moda Bake Shop to one of our Modern Quilt Guild meetings a couple months ago and I loved the browns, greens, and blues in the line and decided to try it out.


When I took the quilt over to my in-laws' house last week, my mother-in-law loved the bright colors and the patterns in the fabric.


This green print is my favorite in the line.


I love how bright and cheery the quilt turned out. Totally fitting for the time of year. And I'm finding that my aesthetic is leaning toward the more simplistic style and design of quilts. Maybe that's why I loved this quilt more than Peekaboo Blush.


Now that I've finished these two quilts, I'm gearing up to start my sister-in-law's quilt. It's a completely different design and process from what I've done in the past (not that that's saying much since I've only finished about five quilts so far). I'm excited to try something new. Along with that, I need to start this bag for my good friend and finish a quilt I started with the last two (a surprise gift for someone special).

Monday, June 21, 2010

Finished Peekaboo Blush

Before my week off, I finished this quilt, Peekaboo Blush. I've heard of a few people going through the quilting process in stages - piecing several quilts at once, then basting them all at once, quilting them all at once, and binding them all at once. I decided to give it a try and it paid off. This quilt took me just over three weeks, start to finish. I think I'll continue with this method from now on.


When I started this quilt, I thought I would end up totally loving it. Not quite. I like it, but it's not my favorite. It's really girly and I'm not a girly girl. It's currently hanging on the quilt stand in my living room. The stand only has spots for three quilts and it's currently full. I think I may have to come up with another quilt display solution.

Tuesday, June 1, 2010

Frolic Around the House

I started three quilts this past week. Ambitious, I know. I only intended to start two, one at my family quilting bee and another for a gift down the road. I was looking through my stash and noticed a Frolic layer cake that I didn't have any plans for so I thought I would use it for another quilt to be gifted. I pieced this top on Friday night. I'm calling it Frolic Around the House.


This was another fast piecing. As with the Make Life baby quilt, I didn't want to place each 10 inch square side-by-side, but I still wanted it to come together quickly, so I broke it up with some white sashing. I headed to Joann's Saturday morning and found some good quality goldenrod colored fabric with a fun design. Thanks to my 50% off coupon and the Memorial Day 10% off your total purchase sale, I got five yards at a steal. Since I used up the layer cake on the front, the back isn't pieced. (I'm deciding this is the way to go when you want the backing to come together easy peasy.) I'll be using the same fabric for the binding. The quilt measures about 60 by 70 inches.


I basted this quilt on the same day as Peekaboo Blush on my mom's hard floors. I had read on a few different blogs that they thought it was easier to baste several quilts at once so I thought I'd give it a try. It was great! I'm definitely going to do it this way from now on. I'm also going to practice free-motion quilting on this one. Hopefully it turns out well, even though I know the recipient won't care either way. There's just something about wanting things to be perfect when I'm giving a handmade gift to someone.

I'll post photos of both this quilt and Peekaboo Blush when they're finished. I'm excited to be getting more quilts under my belt.

Sunday, May 30, 2010

Peekaboo Blush

Saturday morning, I finished piecing the quilt top that I started at our family quilting bee last Saturday, Peekaboo Blush (which is what I'm calling this quilt with a square in square design using a Blush layer cake). I had finished all the blocks last Sunday, pieced them into rows on Tuesday, then pieced the rows together and added a two-inch border Saturday morning.

To make the blocks, I separated the layer cake into high-patterned and low-patterned prints. Then I cut the layer cake squares so that the border or outer square of each block would be the same fabric. Halfway through, I thought it would add a bit more visual interest if I used four different fabrics for the outer square on the rest of the blocks.

One of the solid outer squares.


A high-patterned, scrappy outer square.


A low-patterned, scrappy outer square.


When I pieced the top, I tried to alternate between solid outer squares and scrappy outer squares, but it didn't turn out that way. I thought I had the same number of each type, but I had some spots where I had to put the same type of block next to each other. Oh well, I think it turned out just fine.


For the back, I originally planned on just using the fabrics below, but then opted to add some red. Cutting the correct sizes for this was a challenge this time around; for some reason I kept miscalculating and had to add more to the ends here and there. This back is definitely more "pieced" than it should have been.


My mom recently got new floors put in her kitchen/dining room so I headed over there yesterday to take advantage of a non-carpet place to baste this quilt (I usually baste on my living room floor). Oh man! What a difference it makes to have a hard floor surface for basting. My sister helped me and I think we got this whipped out, ready to quilt in about 30 minutes.

As of now, it's ready for quilting. I hope to get to it this week. I'm doing free-motion again to see if I can get more practice. Plus, free-motion seems to go a lot faster than straight line.

Wednesday, May 26, 2010

Finally Finished: Life Is What You Make It

Sunday was a great day! I got so much sewing done. At my family quilt bee on Saturday (more on that when I get the pictures from my sister - I forgot my camera!), I didn't do a ton of sewing on my own projects as I was busy helping others or letting others use my machine. So on Sunday I wanted to make up some of that time. I finally finished my Life Is What You Make It quilt. And just in time for Amy's Blogger's Quilt Festival, and I'll have something to contribute to Amylouwho's sew & tell this week too!


This quilt measures about 67 by 84 inches. I opted to use a wavy stitch in parallel lines about an inch and a half apart for the quilting. I really like how it turned out. I'm learning though that the "quilting" part of quilting is not my favorite because of how time-consuming and awkward it can be. I love the look of it and feel that the scrunchy look is what makes a quilt a quilt, so I guess I just need to keep practicing and hope that I improve my technique over time.


And here's the back.


I did the binding a little bit differently this time. I made it 2 1/4 inches wide instead of 2 1/2. I definitely liked the smaller binding, but it was a beast when I got to the corners. Two of them I had to stitch by hand because the bulk wouldn't fit under the foot. I also found it helpful to make the binding ahead of time - not at the beginning of the process, but after the quilting was done. In the past I've pieced the binding, pressed it, and added it to the quilt all in one night. But this time I made the binding the day before and then wound it up. Then, the next day, all I had to do was pull out the roll and get to work binding the quilt. I think I'll do it this way from now on.


I really love how this quilt turned out. I was starting to get sick of looking at this fabric for so long and on a few separate projects. But, now that this quilt is finished and put to use (first time snuggle on the couch with the mister last night while we watched the LOST series finale), I love it as much as I did when I first saw it. Thanks Missouri Quilt Co. for the quilt idea.


Thursday, May 13, 2010

Quilting finally done

I spent the evening last night finishing the quilting on my Life Is What You Make It quilt. I know what you're thinking, She isn't done with that quilt yet? Sheesh, she must be a slow poke! And you'd be right. I started this quilt a couple months ago. My quilting time is limited and although I had a few evenings I could have spent sewing/quilting this week, I just wasn't feeling in the mood. It's funny how I can go days without sewing while other times I feel like there aren't enough days in the week. I have to say though that I'm starting to get sick of looking at Make Life. I'm ready to start using new colors and patterns. I bought some more fabric to make another Make Life baby quilt for my cousin, but since it's a gift for her baby and she isn't pregnant yet, I can put that off for a little bit and come back to it after I've had a break.

I'm trying to decide if I want to turn all those strips into the binding (so as not to waste any fabric - I hate wasting pretty much anything), or if I should just give in and buy some more fabric that won't take as much time. The mister thinks I should just get over it and throw those strips away, but I'm not sure I can do it.

In other news, another cousin asked me to teach her how to make a quilt, so we're having a family quilting day. She picked out the design she wants and I wrote up the instructions and drew up the diagrams of the blocks. Our big quilting day is in a week and a half. I'll post the instructions and diagrams here after that.

Don't forget to tune in this Monday (May 17) for a chance to win some great prizes.

Oh, and thanks for voting for my ugly quilt. I took second place!

Tuesday, April 6, 2010

"Life Is What You Make It" Quilt Top Finished

I finished piecing the top of my Life Is What You Make It quilt on Friday night (based on the Missouri Quilt Co.'s version). It's exciting to see it coming together so nicely. The backing will be made up of Grass Simple


and Colorful Ivory, divided by a row of charm squares (two-thirds of the way up).


The finished top is about 66 by 83 inches. I initially wanted to do a border, but I think the size is good for now.


I also pieced four more blocks for my Swirling Star quilt.


Eight down, four to go.


Tuesday, March 30, 2010

Life Is What You Make It

I've decided to change the name of the Make Life quilt to Life Is What You Make It. I've squared the blocks and sewn them into rows. I just need to piece the columns and then the top will be done. Because of the size, I'm not adding a border. Next up? Piecing the back, then basting, quilting, and binding.


The mister is the photographer in the family, but he wasn't home, leaving it up to me to document my progress.

Saturday, March 27, 2010

Progress

I was busy last night. I've had a sick little boy at home and been needing some respite from wiping his nose. So this is what I worked on:


This is the block that I made three years ago as my first attempt at quilting. Unfortunately, this single block was the first and last quilting I did until the end of 2009. It's funny to think of how hard this block was for me to cut and piece as a beginner. I still am a beginner, but the other three blocks came together so much quicker now that I sort of know what I'm doing.


These are the variations that I came up with.


This one's my favorite.


I'm not sure how big I'll end up making the quilt at this point. It will for sure have 12 stars with sashing in between. I think that will probably be big enough, but I think I want to make it for my daughter's twin bed (when she gets one...she's still in a crib).

***************

I also worked on the blocks for my Make Life quilt. Forty down, forty to go.


Here's what some of the pieced blocks look like, minus the inch I have to trim to make them nine inches square. (I hate wasting fabric, so maybe I can incorporate that one-inch strip somehow. And, I don't know why this image is sideways; I didn't take it in portrait mode.)


I'm debating how big to make this one too. I have enough to make it 72x90 with a five-inch border all the way around, but I'm not sure I want it that big. I'm thinking maybe closer to 63x72 or something around there. Once I get most of the blocks sewn together, I'll lay it out and see if the smaller size looks right. No need to sew all 80 blocks if I don't end up using them all.

LinkWithin

Related Posts with Thumbnails