Wednesday, June 13, 2012

EZ Dresden Ruler Winner

Thanks for all your comments about my Color Cog mini. I really appreciate all your kind words! Mr. Random picked number 62 as our winner.

Congratulations, zees5! I'll be sending you an email to get your mailing address.

I hope you're all enjoying the EZ Dresden Challenge blog hop. There are a few more days left before you'll be unleashed to start working on your own challenge entries. Have fun and good luck!

Friday, June 8, 2012

EZ Dresden Tutorial and Giveaway - Color Cog Mini Quilt

***This giveaway is now closed.***

Welcome blog hoppers! I hope you're enjoying the blog hop as much as I am. There have been so many tutorials that have had me thinking, Why didn't I come up with that?! and I didn't know the ruler could do that!

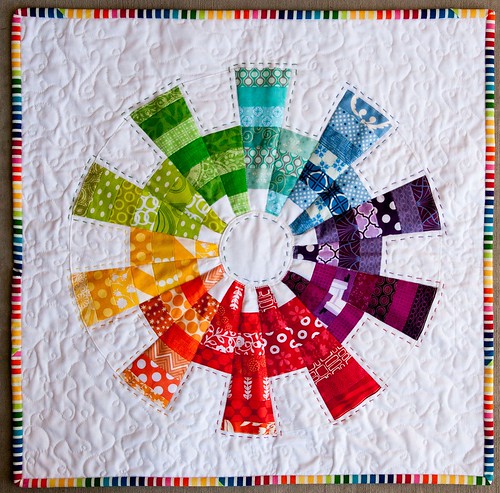
For my tutorial, I'm going to show you how to put together a staggered, strip-pieced dresden like my Color Cog mini quilt.

Finished EZ Dresden Challenge Mini Quilt

Since the EZ Dresden ruler requires 20 blades to make a full circle, and since there are 12 colors in the traditional color wheel, you'll need to omit two colors (four blades) to achieve a full circle. (I left out blue-purple and I combined yellow with yellow-orange.)

EZ Dresden Challenge

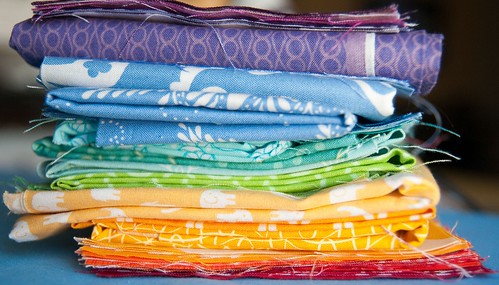
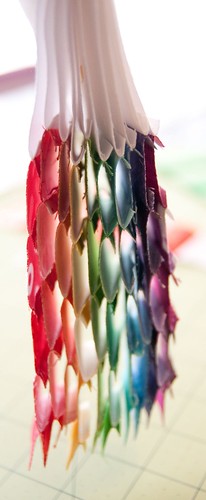
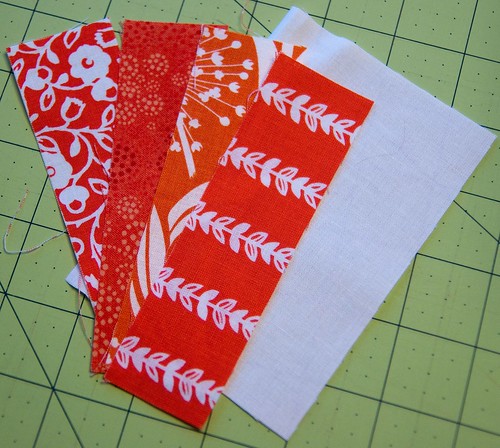
Start by cutting at least six strips that measure 1.5" x 5" for each color. This will yield two blades. You can have anywhere from two to six different fabrics. (I varied between four and six.) You'll also need a background piece that measures 3.5" x 5" for each color, so a total of 10 rectangles. I used Kona white. The image below shows only four colored strips, so just pretend there are six strips shown.

EZ Dresden Challenge

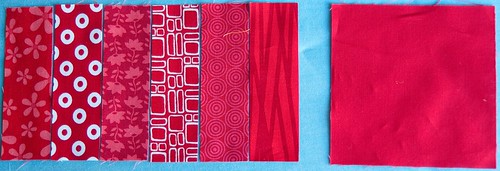
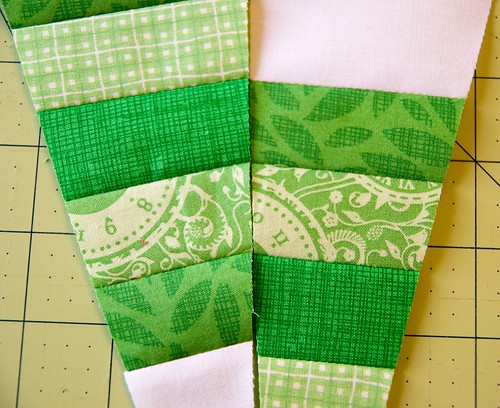
Layout your strips in an order that is pleasing to you.

EZ Dresden Challenge

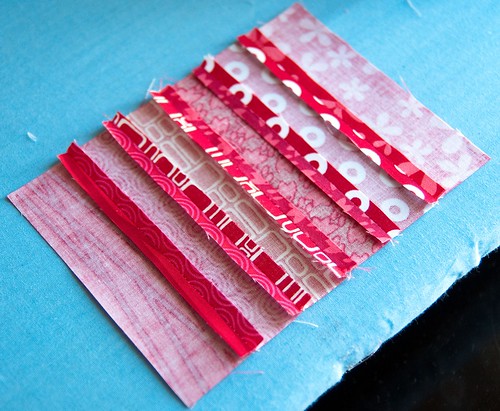
Piece the strips together and press the seams open or to the side. I found that pressing them open helped since there are so many pieces in this mini quilt.

EZ Dresden Challenge

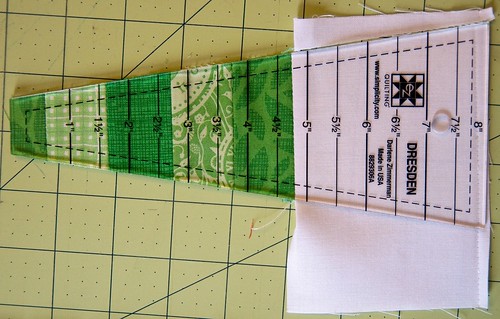
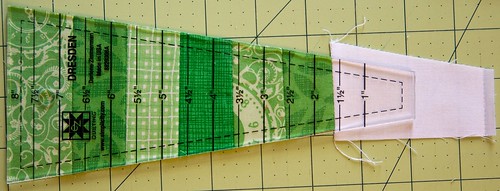
Next, take your EZ Dresden ruler and line up the top of the ruler with one end of your pieced strips near the left edge if you're right-handed or near the right edge if you're left-handed.

EZ Dresden Challenge

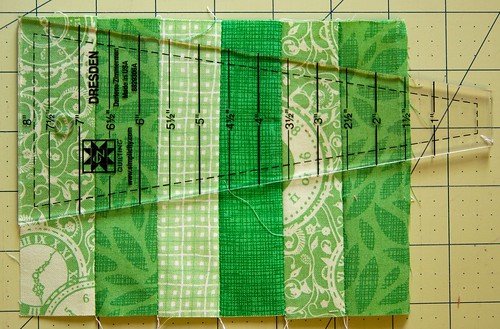
With your rotary cutter, make a cut on the side with the greater amount of fabric outside the ruler. Then cut on the other side.

EZ Dresden Challenge

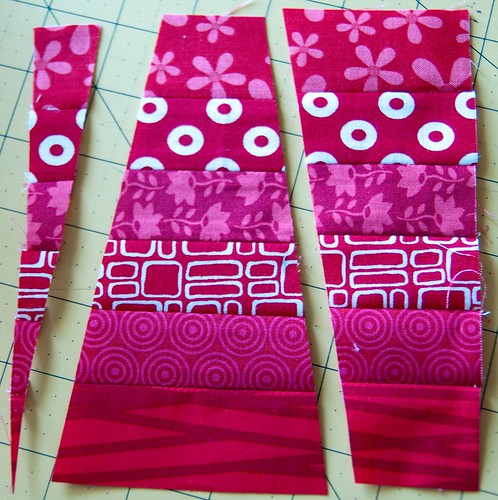
Turn your ruler around and line up the opposite end of your pieced strips with the 5" mark on your ruler. Cut the remaining side and the bottom (narrow) edge.

EZ Dresden Challenge

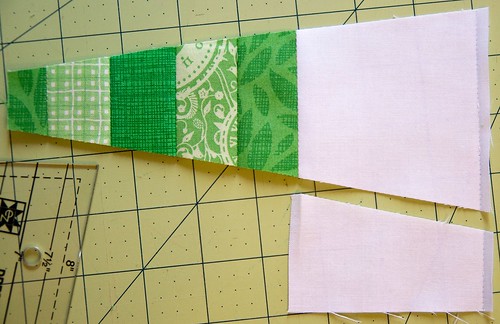
You should now have two sizes of blades. Repeat the previous steps for all your colors. You should now have 20 blades, 10 of each size.

EZ Dresden Challenge

Now, take your smaller blade and your 3.5" x 5" background piece and lay them right sides together as shown below, off-setting about a half inch of the background fabric.

EZ Dresden Challenge

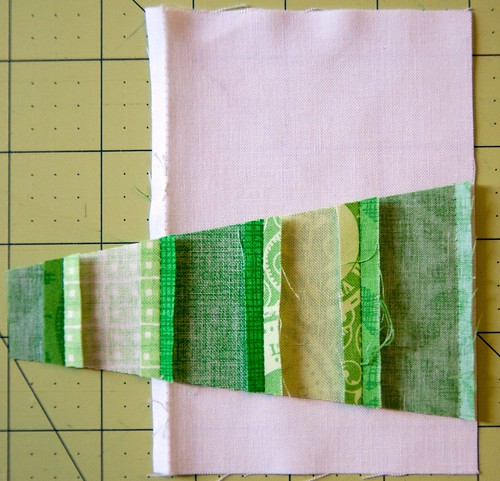
Stitch along the longer edge and press your seams open. Repeat with your nine remaining smaller blades.

EZ Dresden Challenge

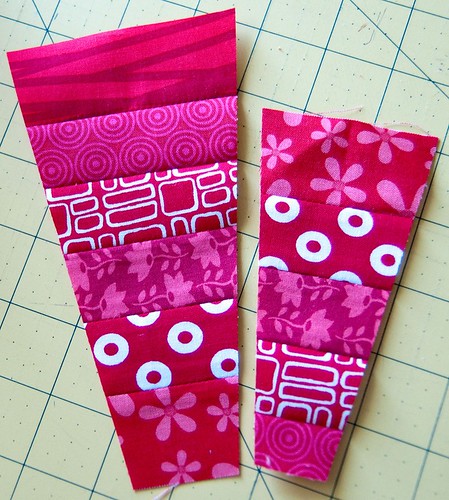
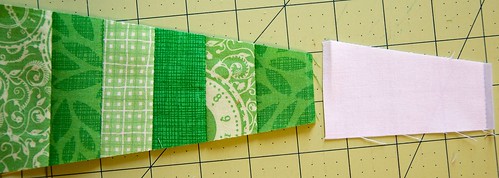
Lay your ruler on your smaller blade, aligning the narrow end of the ruler with the smaller end of your pieced strip. The pieced strip and the ruler should match up pretty well end-to-end.

EZ Dresden Challenge

Cut on either sides of the background piece to get your 8" blade.

EZ Dresden Challenge

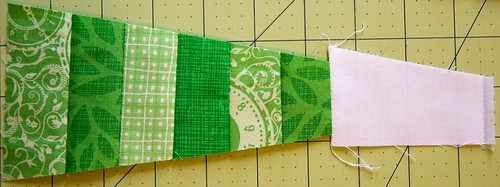
Take the leftover background piece from the previous step and place the wider edge along the narrow edge of your longer blade, right sides together.

EZ Dresden Challenge

Stitch in place and then press your seam open.

EZ Dresden Challenge

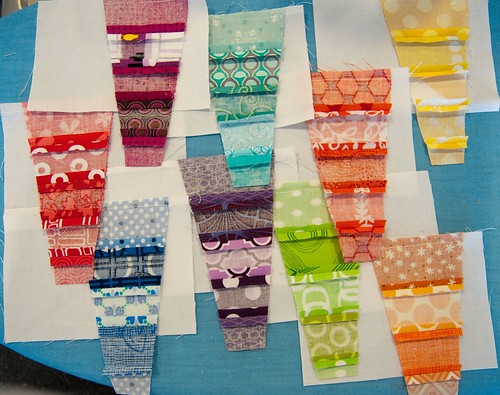
Place your ruler on top of your fabric, making sure to align them correctly. Trim the excess. Repeat with your nine remaining longer blades.

EZ Dresden Challenge

Now place the longer blade and the shorter blade side by side, matching the second to bottom colored fabric on the long blade with the second to top fabric on the short blade.

EZ Dresden Challenge

Lay all your blades side by side to create your dresden circle.

EZ Dresden Challenge

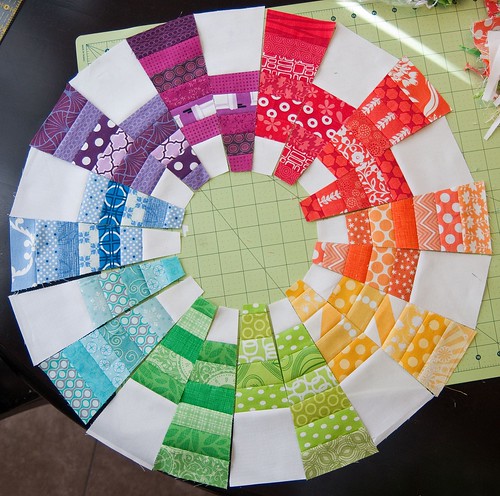
At this point, you have a couple options for piecing your dresden. If you want to use set-in seams (requiring you to piece the curve), separate your dresden circle into quadrants and piece each quadrant.

EZ Dresden Challenge

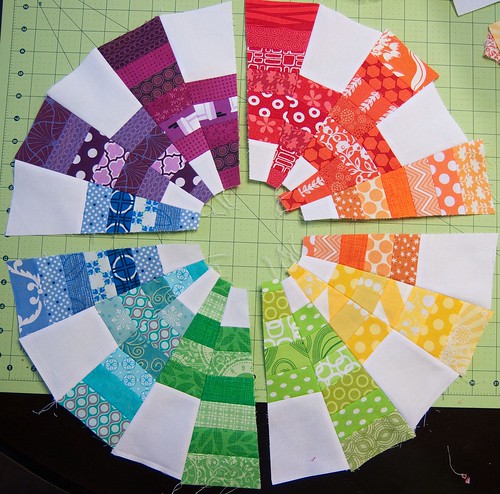
If you don't want to piece the curve, but you want a finished outer edge before appliqueing your dresden to another piece of fabric, you can either make traditional dresden plate points, or you can use Lee's fantastic idea and press the outer edge under before piecing the blades. (I wish I had thought of this!) I pieced my entire dresden, then turned and pressed the outer edge under, and appliqued it to my background fabric (Kona white). I also added another appliqued circle to cover the raw-edged circle of the dresden.

Once you've attached your dresden to your larger background fabric, you can baste it and quilt it however you like. I hand quilted around the perimeter of the cog design as well as in the center circle. Then I used white thread to free-motion quilt by machine in the background.

Finished EZ Dresden Challenge Mini Quilt

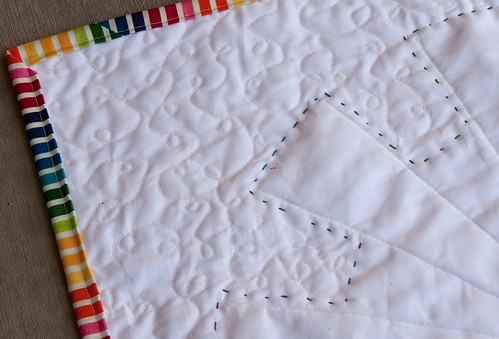
I also quilted in the ditch of each blade for a little more security.

Finished EZ Dresden Challenge Mini Quilt

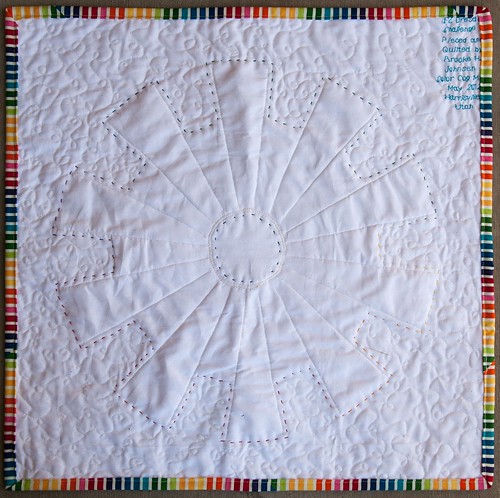
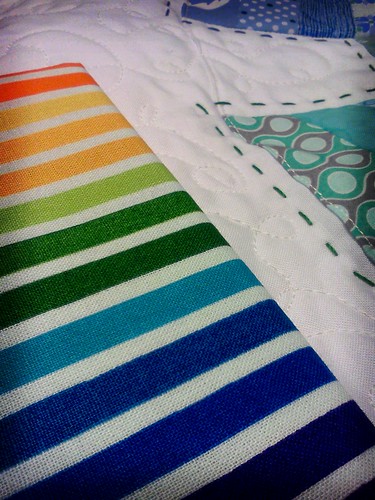
Once everything is quilted the way you'd like it to be, attach your binding. I used a rainbow stripe from the Remix line from Robert Kaufman to reinforce the color wheel theme.

And there you have it. A finished color cog mini quilt.

Finished EZ Dresden Challenge Mini Quilt

I hope you've enjoyed this tutorial and that it's given you some more ideas of ways to use the EZ Dresden ruler. If you'd like a chance to win one of your own, leave a comment. I'll draw a winner on Wednesday, June 13.

Also, make sure to visit the other bloggers. You can see a list of the schedule here.

Wednesday, June 6, 2012

WIP Wednesday 6/6/2012

It's been a while since I've linked up to WIP Wednesday. I'm finding myself wanting to stray from my to-do list so this post will help serve as a reminder of the things I MUST get done before the end of June - and time is running out. Nothing like a good splash of cold water to wake you up in the morning, right? So, let's get to it.

WIP Wednesday at Freshly Pieced

My current #1 priority is to attach the binding to my EZ Dresden mini quilt for which I'll be posting a tutorial on Friday for the blog hop. I've got a teeny bit of hand-stitching to do still as well. I've already shown a couple sneak peeks, but here's another.

EZ Dresden Challenge

The next priority item on my plate right now is this melon patch quilt. My best friend is getting re-married at the end of the month and I really wanted to make her and her new hubby a quilt. I've got my work cut out for me to get this finished by the time we head out to Oregon in a few weeks! The quilt will be four blocks by four blocks. Each block measures 16 inches, I think (or is it 18?), so it'll be a nice sized throw quilt. The fabrics are Anna Maria Horner's Innocent Crush (Potpourri colorway) and Kona white.

Innocent Crush Melon Patch Quilt Beginnings

Innocent Crush Melon Patch Quilt Beginnings

I'm still considering this next block a WIP since I haven't made it to the post office yet (sorry, Angela!).

For May in the Sew Beautiful Bee, Angela asked for improv pineapple blocks using this tutorial. She sent out a bunch of Hawaiian prints for us to use as the center square with blues, greens, and oranges for the strips and corners. I'm so excited to see her quilt come together. It's going to be gorgeous!

Pineapple Block for Angela

This last block isn't a WIP for me, but I think it still is for Sam, and since I haven't blogged about it yet, I'm including it here. In our local guild bee, La Beeda Loca, Sam asked us to make paper-pieced single girl blocks. I've done a bit of paper piecing and I still find it a bit challenging. I'm not sure what it is about it though. If anyone has any tips they'd like to share, I welcome them!

Paper-Pieced Single Girl

That wraps up what I've been working on the last little while. I've made a couple simple dresses for my three-year-old that I haven't had the chance to photograph yet. I'll hopefully post about those one of these days. In the meantime, you should check out the other WIP Wednesday posts, the EZ Dresden blog hop posts (there have been some really great ones so far!), and then come back here on Friday for my EZ Dresden tutorial.

Happy Wednesday, everyone!

Friday, June 1, 2012

EZ Dresden Challenge Kick-Off

Today marks the kick-off to the Salt Lake Modern Quilt Guild and EZ Quilting/Simplicity EZ Dresden Challenge, celebrating Darlene Zimmerman’s 20th anniversary designing quilting tools for EZ Quilting. Over the next two weeks, you'll have the opportunity to see boatloads of inspiration from bloggers who have prepared tutorials, interviews, and lots of great information about the EZ Dresden ruler. You'll have the chance to win an EZ Dresden ruler for yourself at each stop along the way. After the blog hop, the challenge will run all summer long, culminating in a link-up party at the Salt Lake Modern Quilt Guild's blog in September.

Blog Hop Schedule

June 1
Salt Lake MQG Kick-Off

June 2
Lee @ Freshly Pieced

June 3
Kati @ From the Blue Chair

June 4
Victoria @ Bumble Beans, Inc.
Tanya @ Squares and Triangles

June 5
Val @ How About Pink Please
Leigh @ Leedle Deedle Quilts

June 6
Amy @ Amy's Creative Side
Elisa @ Stitch Outside the Ditch

June 7
Katie @ Swim Bike Quilt
Emily @ Em's Scrapbag

June 8
Melissa @ Happy Quilting
Brooke @ Pitter Putter Stitch (me)

June 9
Nicole @ Mama Love Quilts
Amy @ Don't You Know Who I Am?

June 10
Elizabeth @ Don't Call Me Betsy
Colleen @ The Busy Bean

June 11
Faith @ Fresh Lemons Quilts
Deonn @ Quiltscapes

June 12
Angela @ The Artists' House
Barbie @ The Quilting Mill

June 13
Amy @ Diary of a Quilter

June 14
Jessica @ Sew Crafty Jess

June 15
Salt Lake MQG Wrap-Up

Categories

  • Small/Mini Quilts: 24-inch maximum side length
  • Traditional Design: 50-inch minimum on one side
  • Innovative Design: 50-inch minimum on one side

EZ Dresden Challenge

So, wanna know what you can win?

Prizes
The judges will select their five favorites from each of the three categories, then decide as a team the 1st, 2nd, and 3rd place winners.

Grand Prize (1st Place)

  • Singer 7469Q Confidence Quilter Sewing Machine
  • Photo of your project in 1/3 page Simplicity advertisement in Quilting Arts Magazine
  • Small quilt made by Darlene in her latest fabrics
  • Simplicity Deluxe Sidewinder
  • American Spirit by Fairfield queen-sized batting
  • One year membership to The Quilt Alliance
  • Subscription to Quilting Arts magazine
  • FQ bundle of Robert Kaufman Kona cotton & Feedsack Lady prints
  • Selection of EZ Quilting Rulers designed by Darlene Zimmerman
  • Darlene Zimmerman’s latest pattern book

2nd Place

  • Olisio Iron
  • Simplicity Deluxe Sidewinder
  • American Spirit by Fairfield queen-sized batting
  • FQ bundle of Robert Kaufman Kona cotton & Feedsack Lady prints
  • Selection of EZ Quilting Rulers designed by Darlene Zimmerman
  • Darlene Zimmerman’s latest pattern book

3rd Place

  • Gutterman Thread (In-home Cabinet) 100 spools, 100 m, 100% cotton
  • Simplicity Deluxe Sidewinder
  • American Spirit by Fairfield queen-sized batting
  • FQ bundle of Robert Kaufman Kona cotton & Feedsack Lady prints
  • Selection of EZ Quilting Rulers designed by Darlene Zimmerman
  • Darlene Zimmerman’s latest pattern book

We'll also have a few random drawings for additional winners.


Judges

  • Darlene Zimmerman: EZ Quilting Ruler Designer, Fabric Designer—Feedsack Lady by Robert Kaufman, Quilter/Designer/Teacher, and Reproduction Fabric Know-It-All
  • Michele Muska: Marketing Communications Director for Simplicity Creative Group, Board Member—The Quilt Alliance, Designer/Teacher/Artist
  • Jacquie Gehring: Blogger-Tallgrass Prairie Studio, Quilter/Author/Teacher, Member-Chicago Modern Quilt Guild
  • Victoria Findlay Wolfe: Blogger/Designer-Bumble Beans, Inc., Founder-BASICS, Inc., Founder-New York Metro Modern Quilt Guild

PHEW! Thanks for sticking with me through all that info. I'm really excited about this challenge, and hope you'll play along. Remember to check out the Salt Lake Modern Quilt Guild's blog tomorrow and come back here on June 8 to see my tutorial!

EZ Dresden Challenge Sneak Peak

LinkWithin

Related Posts with Thumbnails